> ## Documentation Index
> Fetch the complete documentation index at: https://lago-ftr-wallet-improvements.mintlify.site/llms.txt
> Use this file to discover all available pages before exploring further.
# Salesforce CRM
> Lago syncs billing data to Salesforce in real-time.
**PREMIUM ADD-ON** ✨
This integration is only available to users with a specific paying add-on. Please
**[contact us](mailto:hello@getlago.com)** to get access to Salesforce CRM integration.
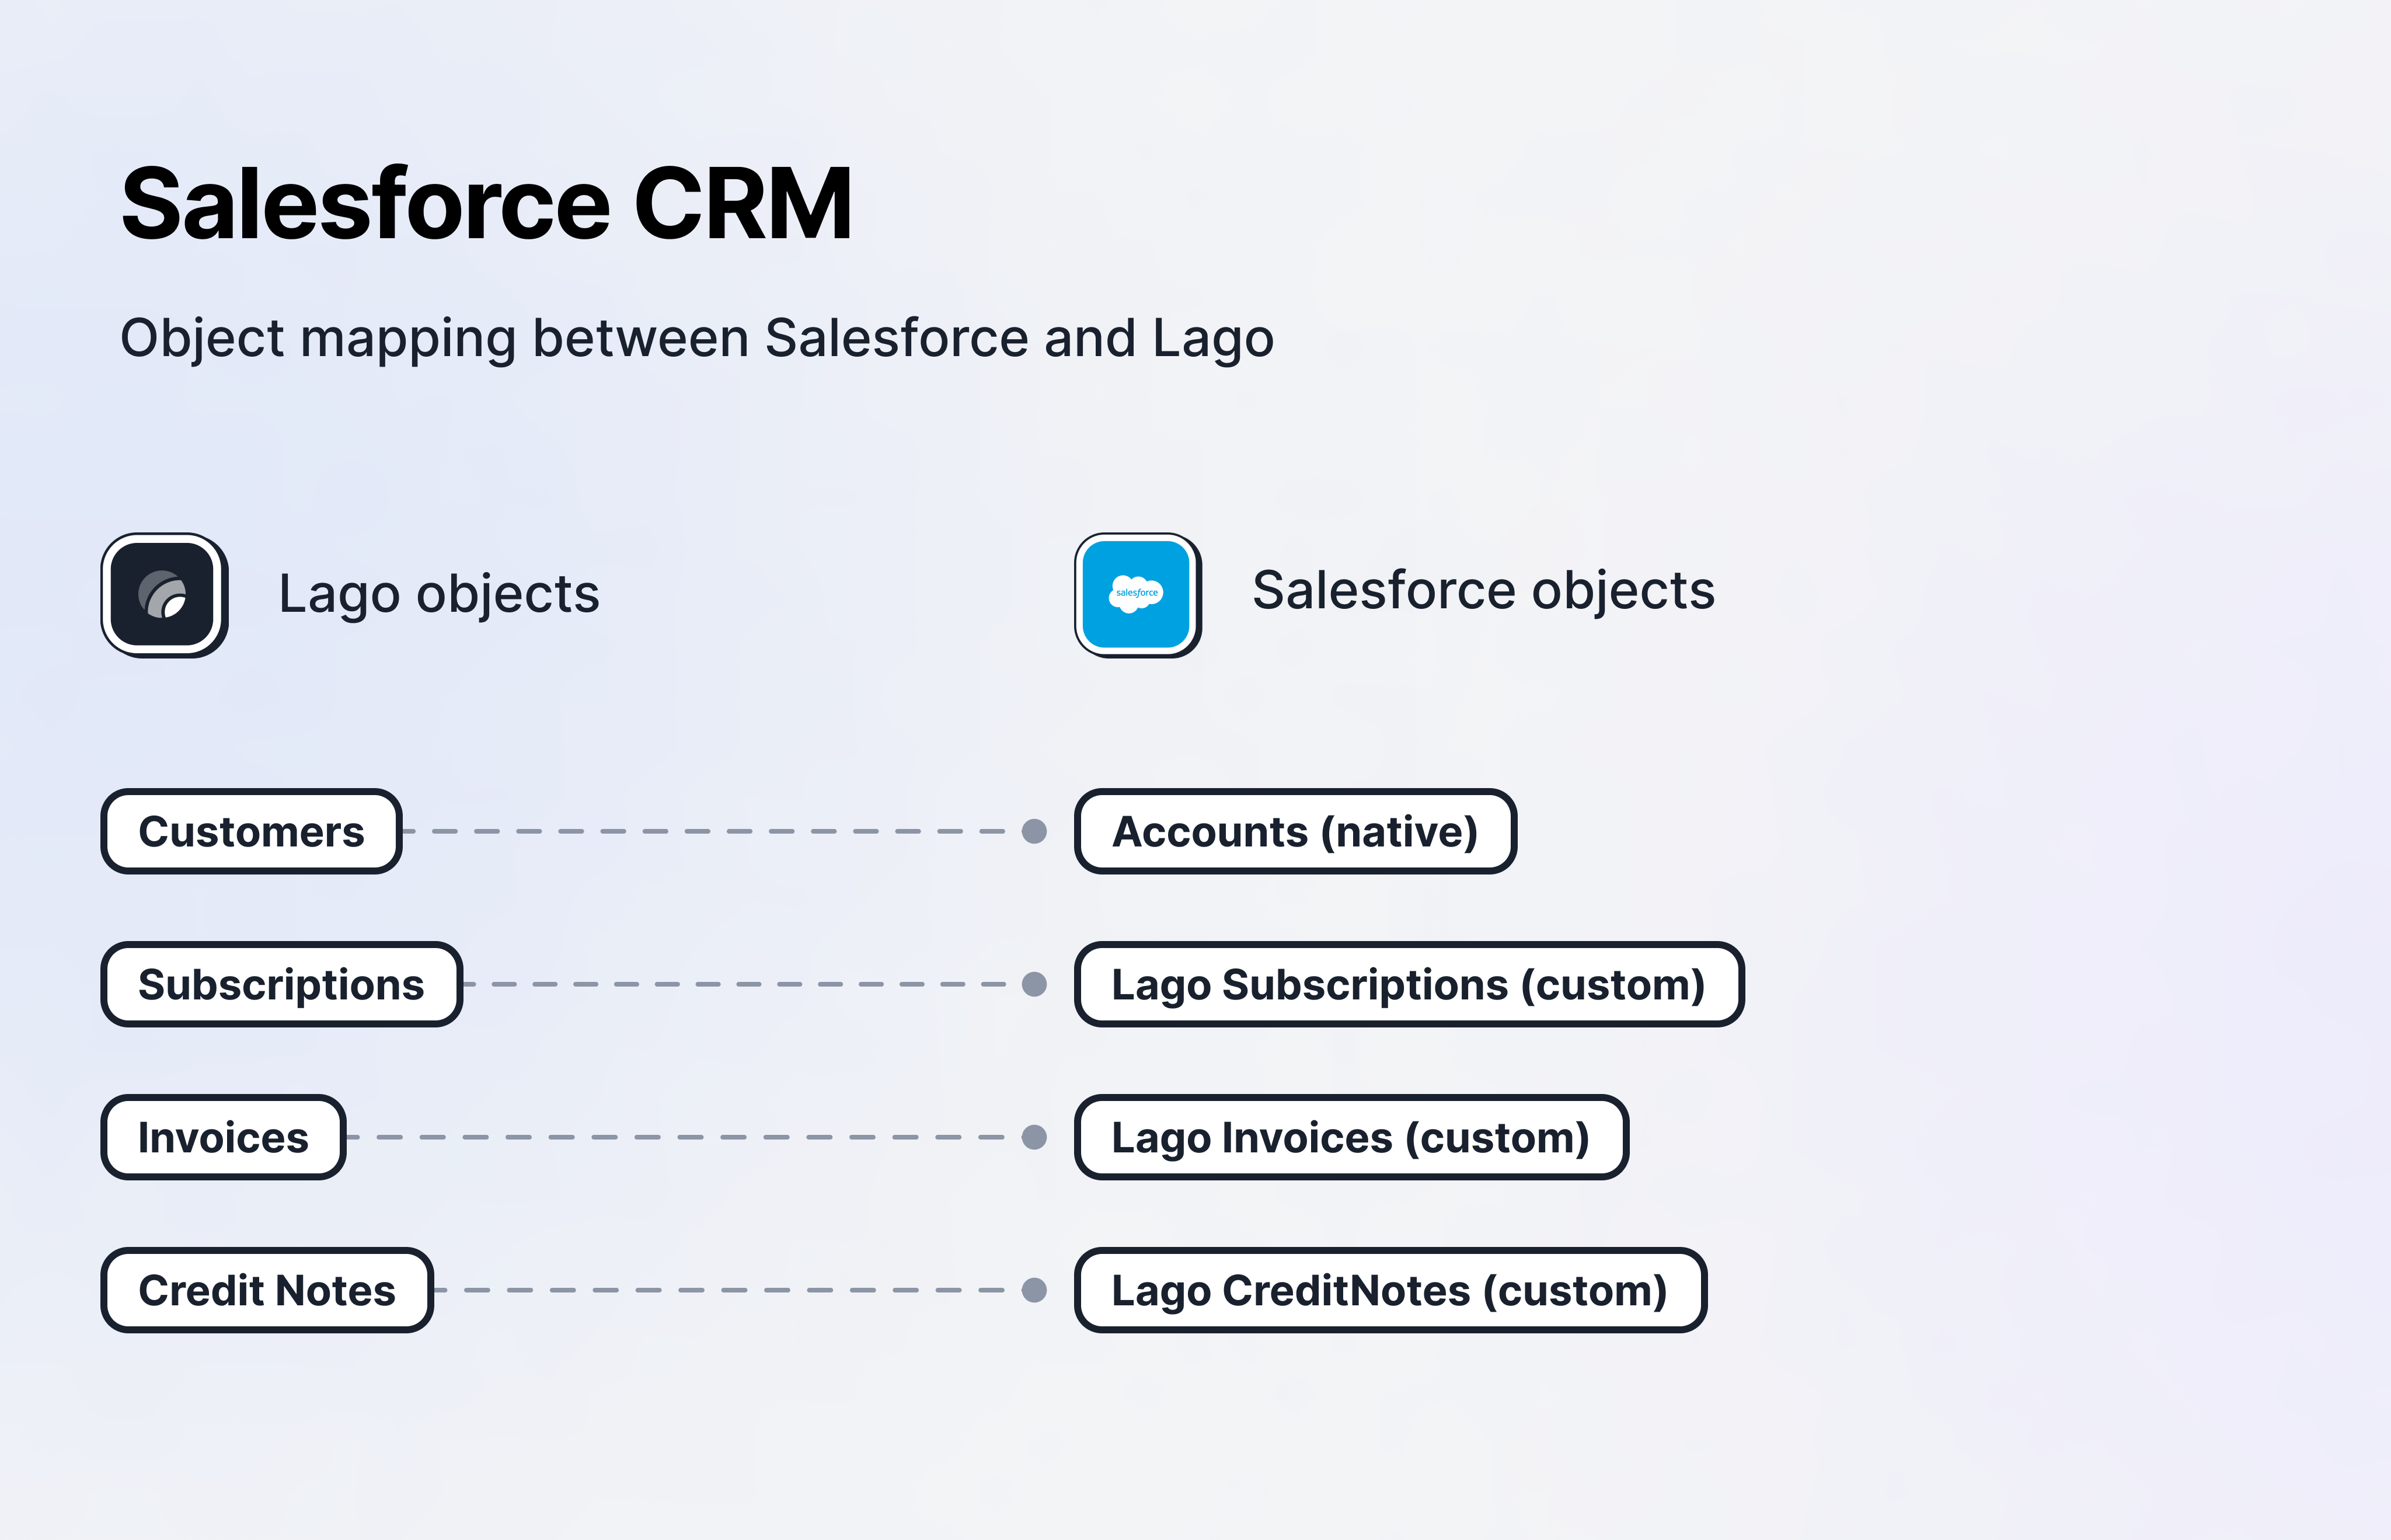
## Object mapping
## I. Integration configuration
### Install Salesforce CRM Package
To gain premium access to our Salesforce Package application, please don't hesitate to contact us.
You can initiate the installation process **by clicking on the provided link**, which will direct you to the installation
page where you can follow step-by-step instructions for a seamless integration. If you have any questions or need assistance
during the installation, our dedicated support team is here to help you every step of the way.
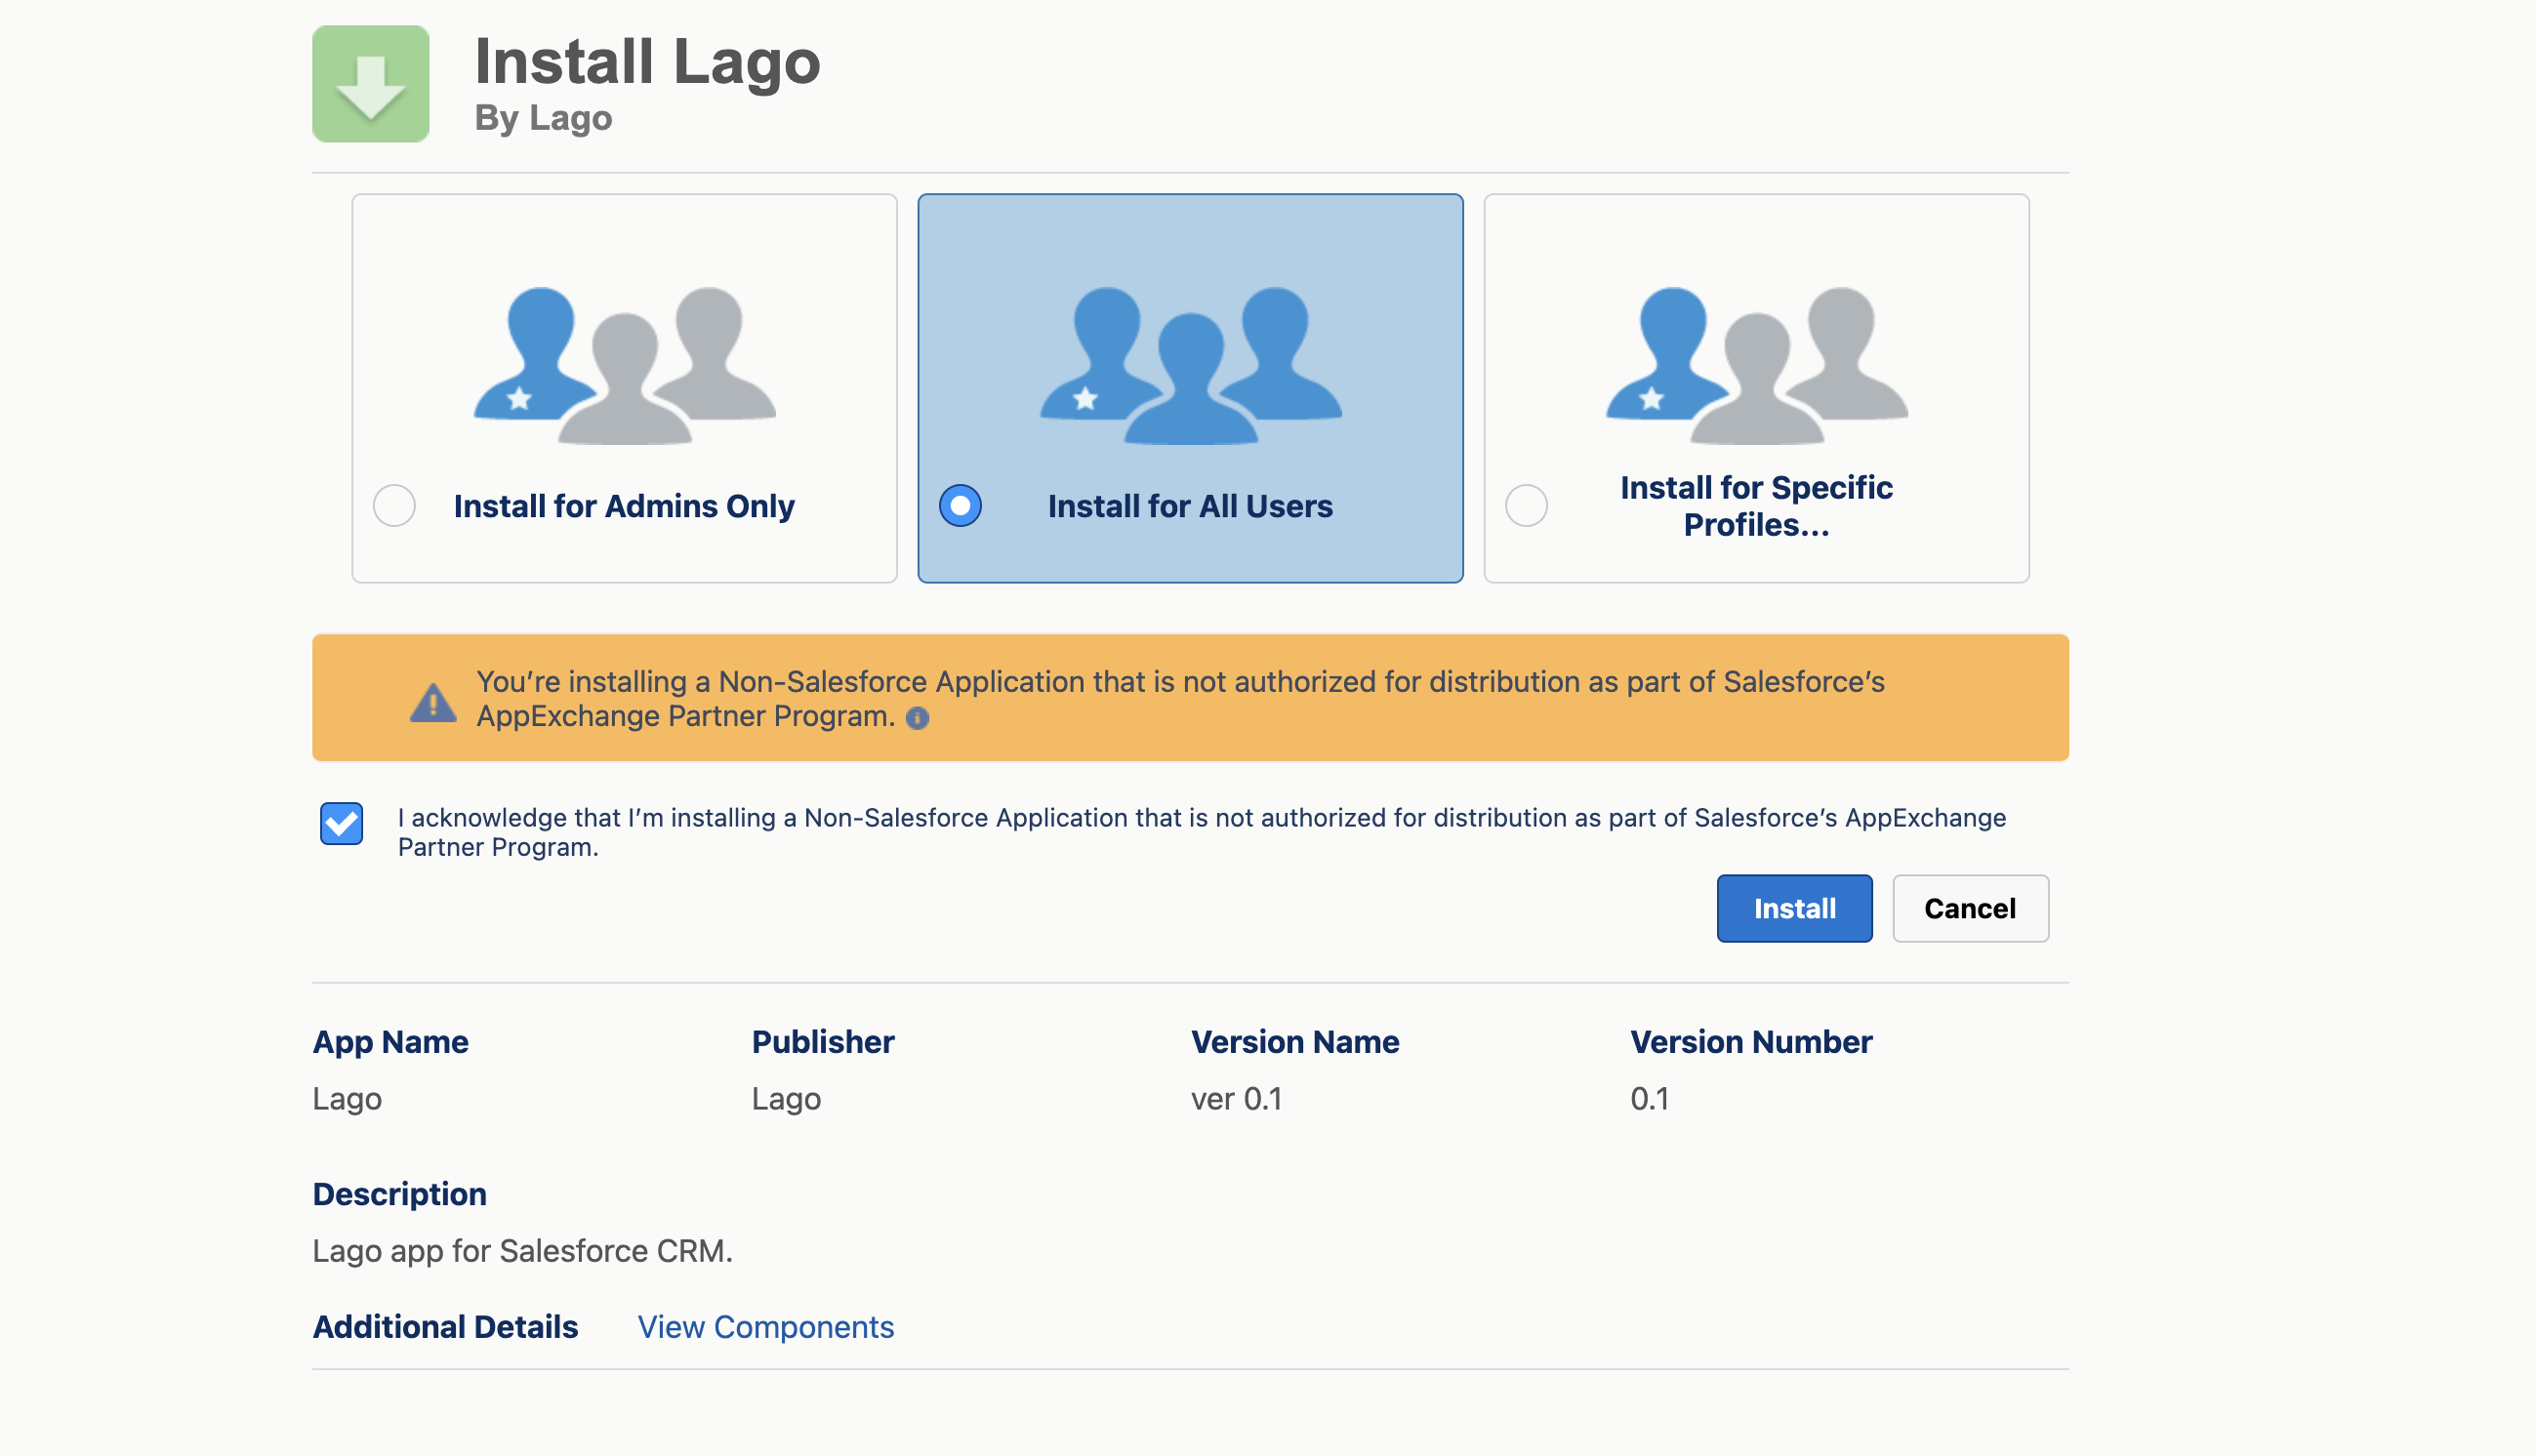
To ensure a successful installation, please follow these steps:
1. We recommend selecting the **"Install for all users"** option;
2. Click on the **"Install" button**;
3. Make sure to **check the box to grant access to these third-party websites**; and
4. Once completed, you'll have **successfully installed** the Lago Salesforce App.
Please note that the installation process may take a few minutes to complete.
However, rest assured that you will receive an email confirmation once the installation is finished.
### Webhook config: sync real-time data
After installation in Salesforce CRM, set up a webhook URL in Salesforce to receive real-time data from Lago.
This involves **configuring a new "Site" in Salesforce's setup section**.
Note that the four main actions described below should be performed by a Salesforce Admin and is only required during the initial setup.
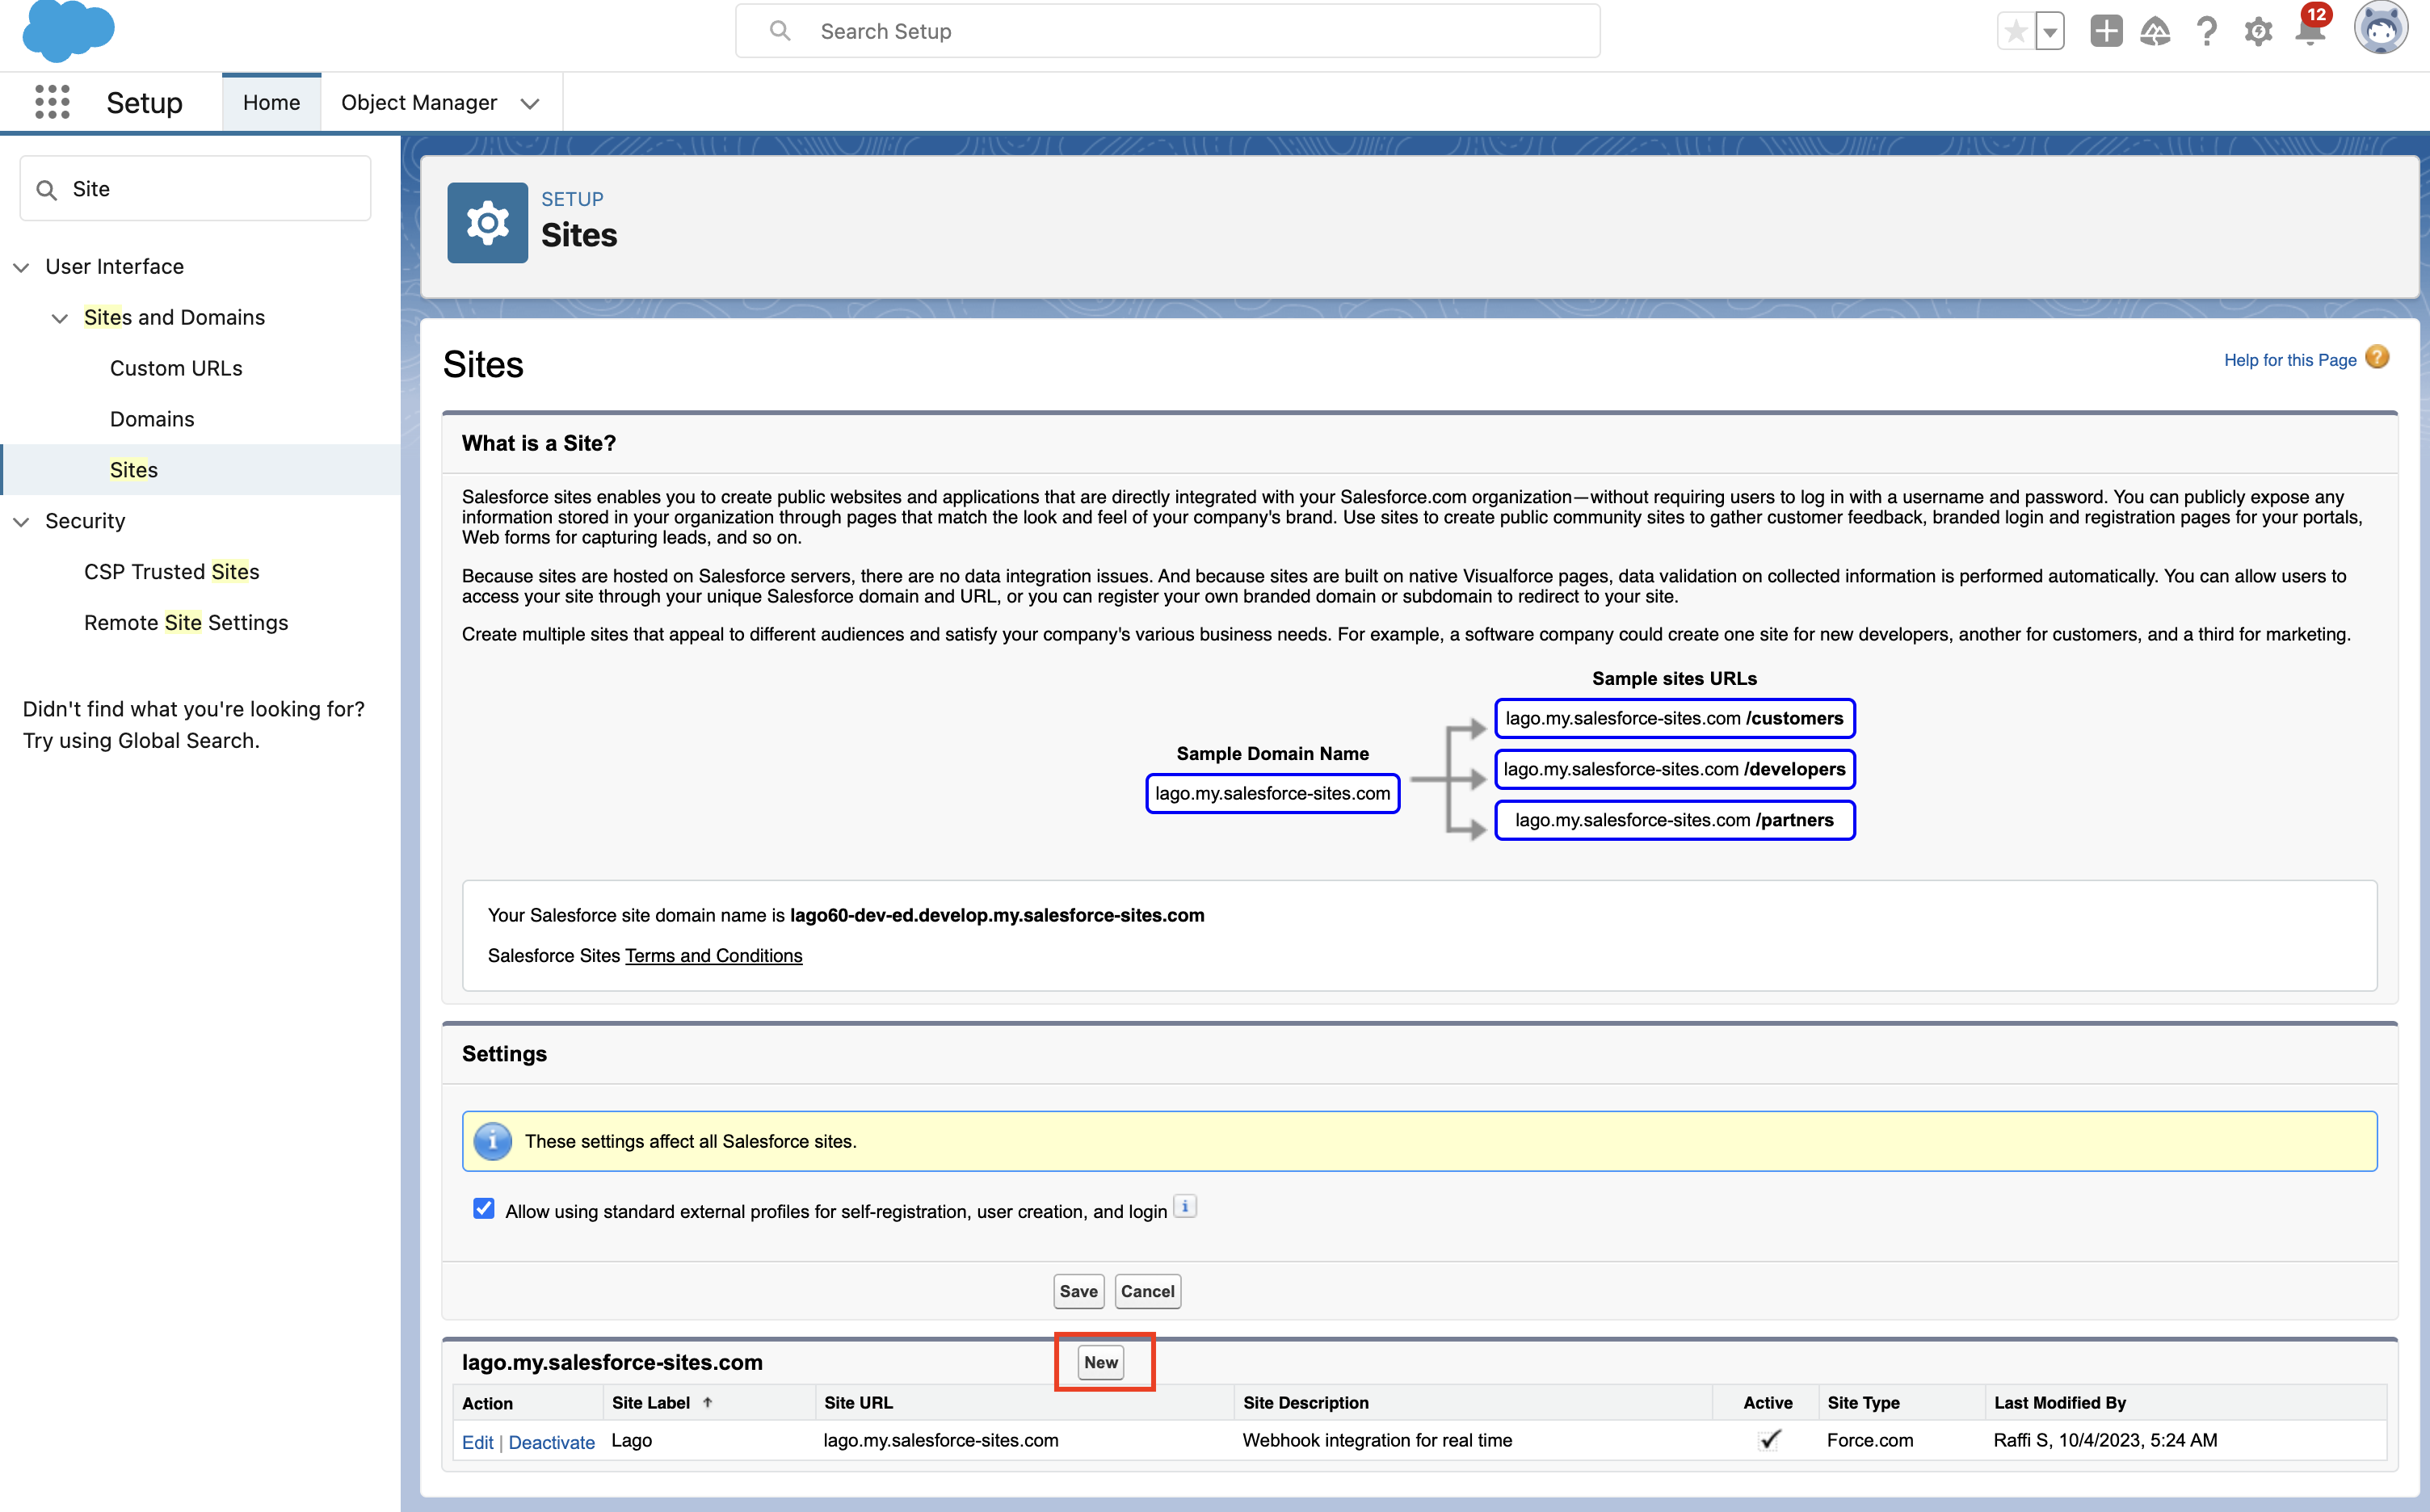
1. Click the gear icon in the upper right to access **Salesforce Setup**;
2. Search and navigate to the Sites section; and
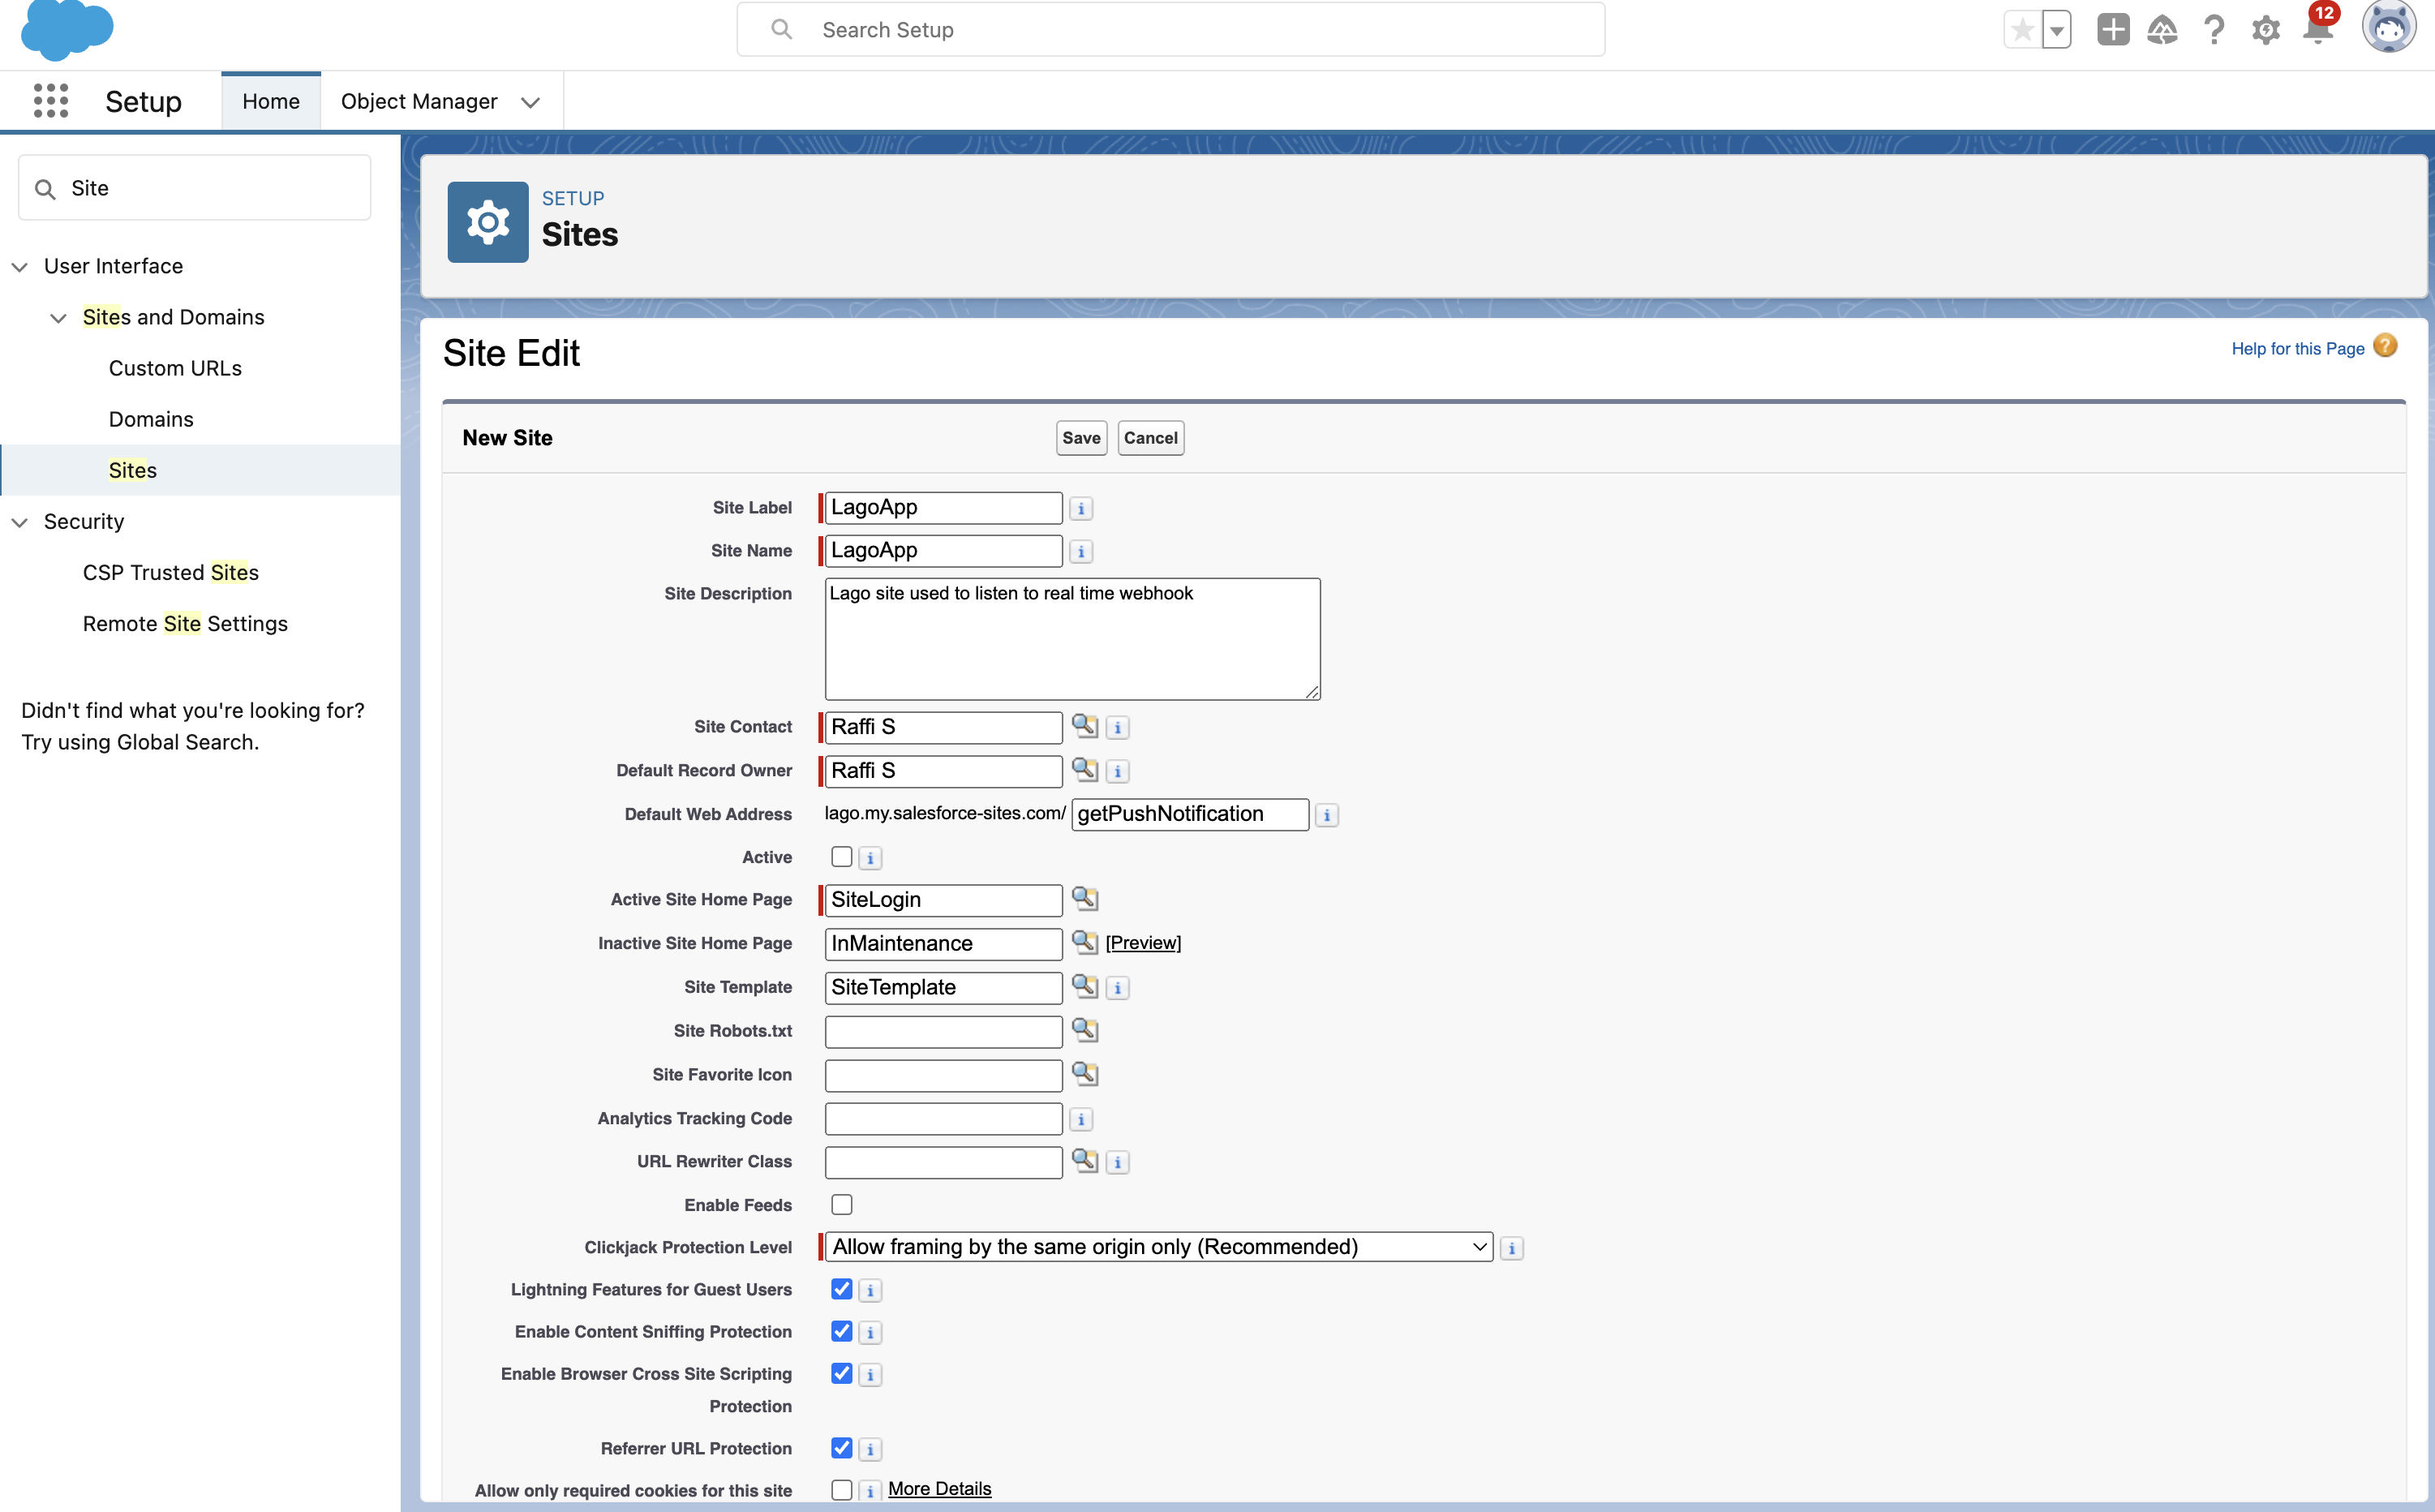
3. Create a new Site (see picture below).
When creating a new site, follow these steps:
1. Set a unique **Site Label**;
2. Specify a unique **Site Name**;
3. Optionally, add a **Site Description**;
4. Ensure the **Site Contact** and **Default Record Owner** are filled;
5. Set the **Default Web Address** prefix to `getPushNotification`;
6. Choose `SiteLogin` as the **Active Site Home Page**; and
7. Don't forget to **save the new site**: and
8. **Activate the newly created site** by going to the Site Details and clicking the `Activate` button.
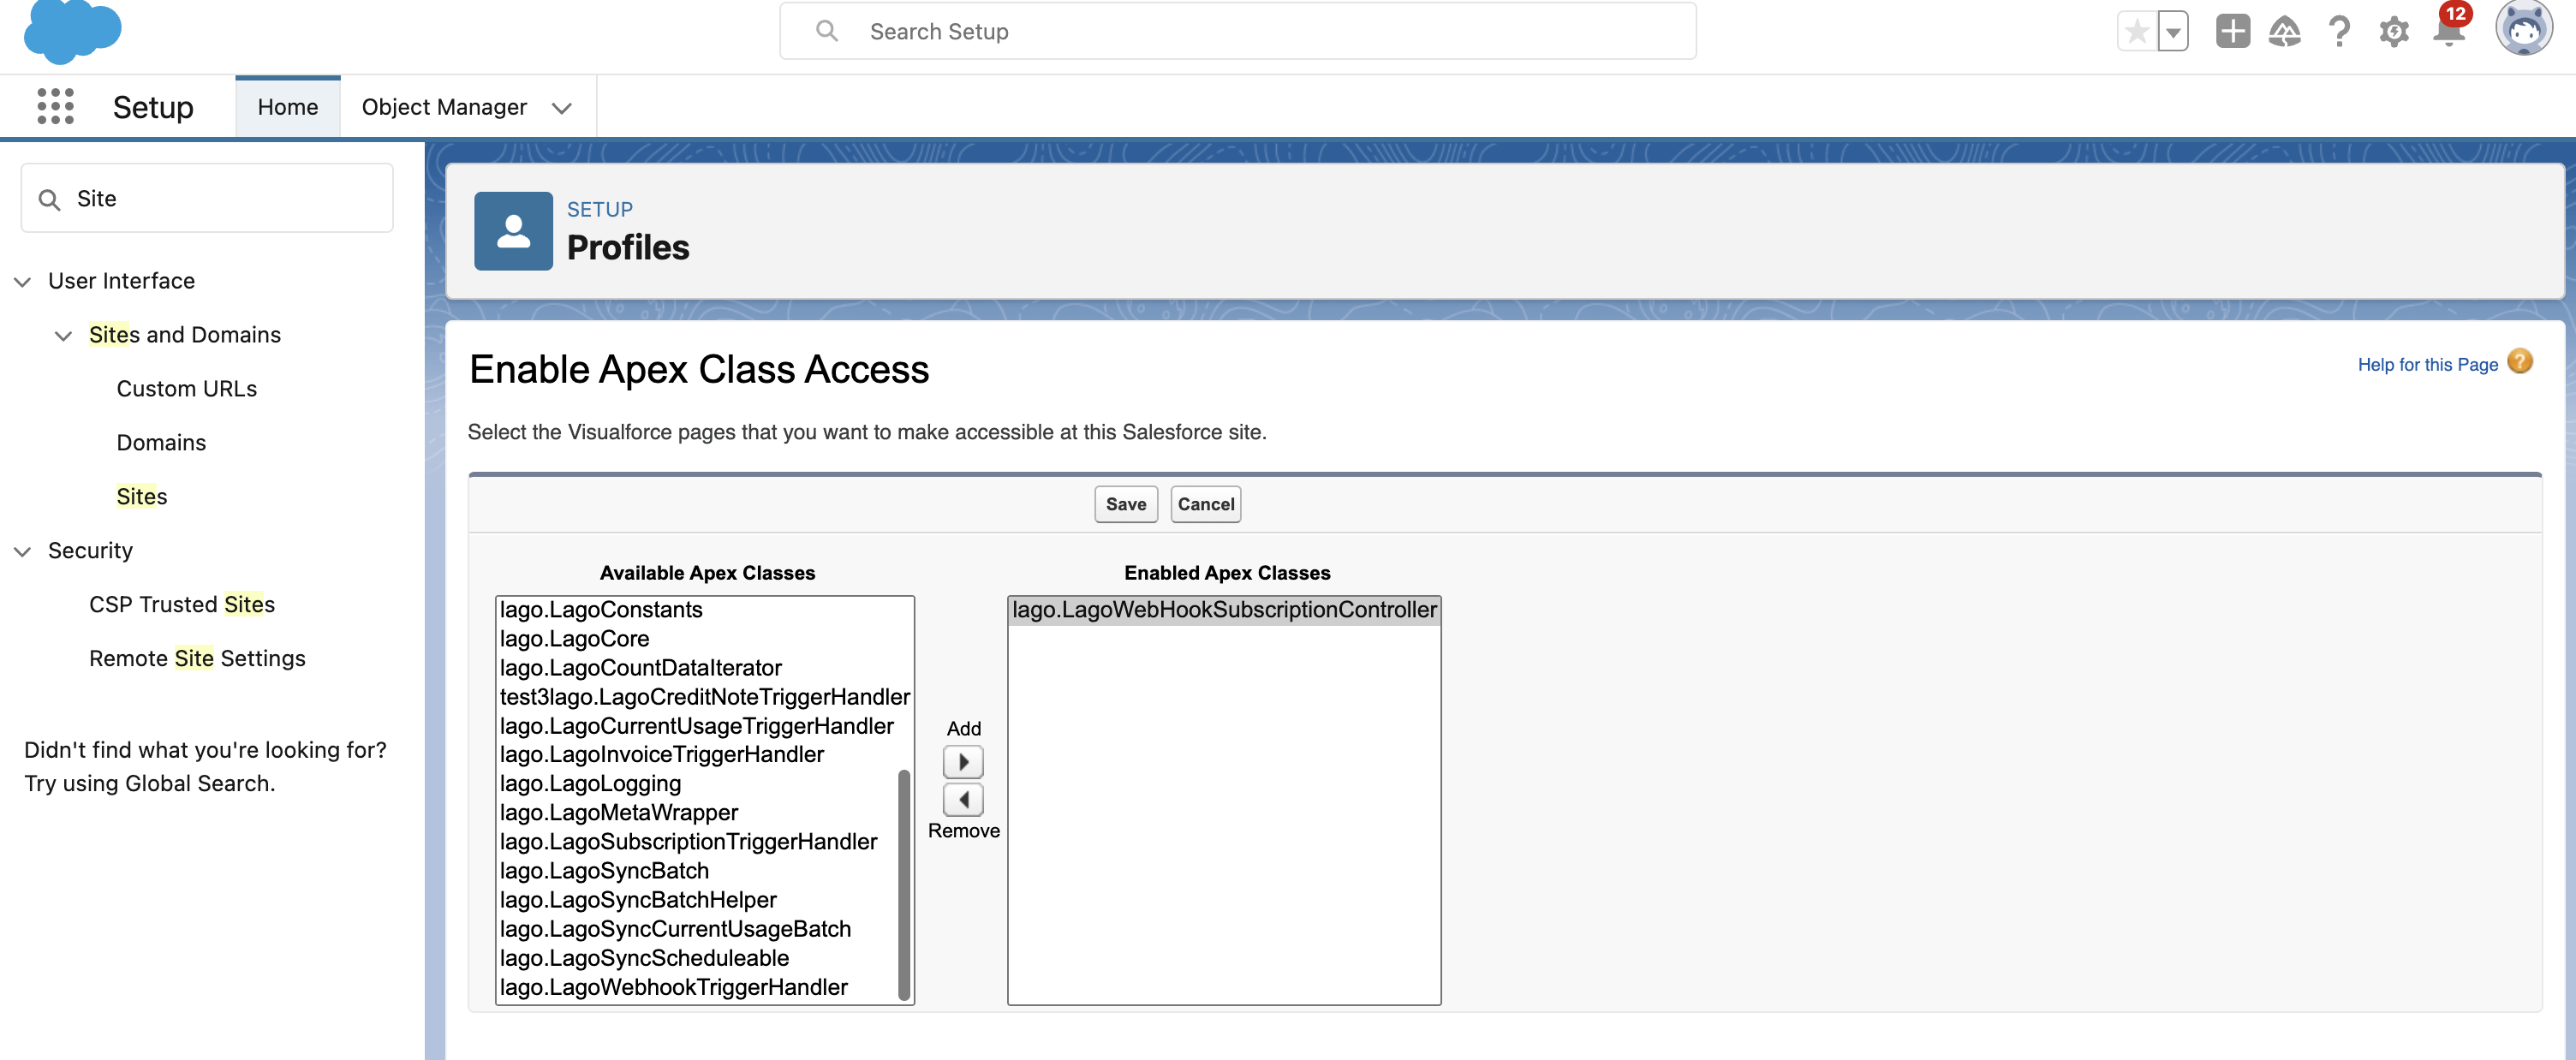
To edit Public Access Settings for your new Site:
1. Visit the site and click **Public Access Settings**;
2. In the **Enabled Apex Class Access** section, click "edit";
3. Add `LagoWebHookSubscriptionController` to **Enabled Apex Classes**; and
4. Save your changes.
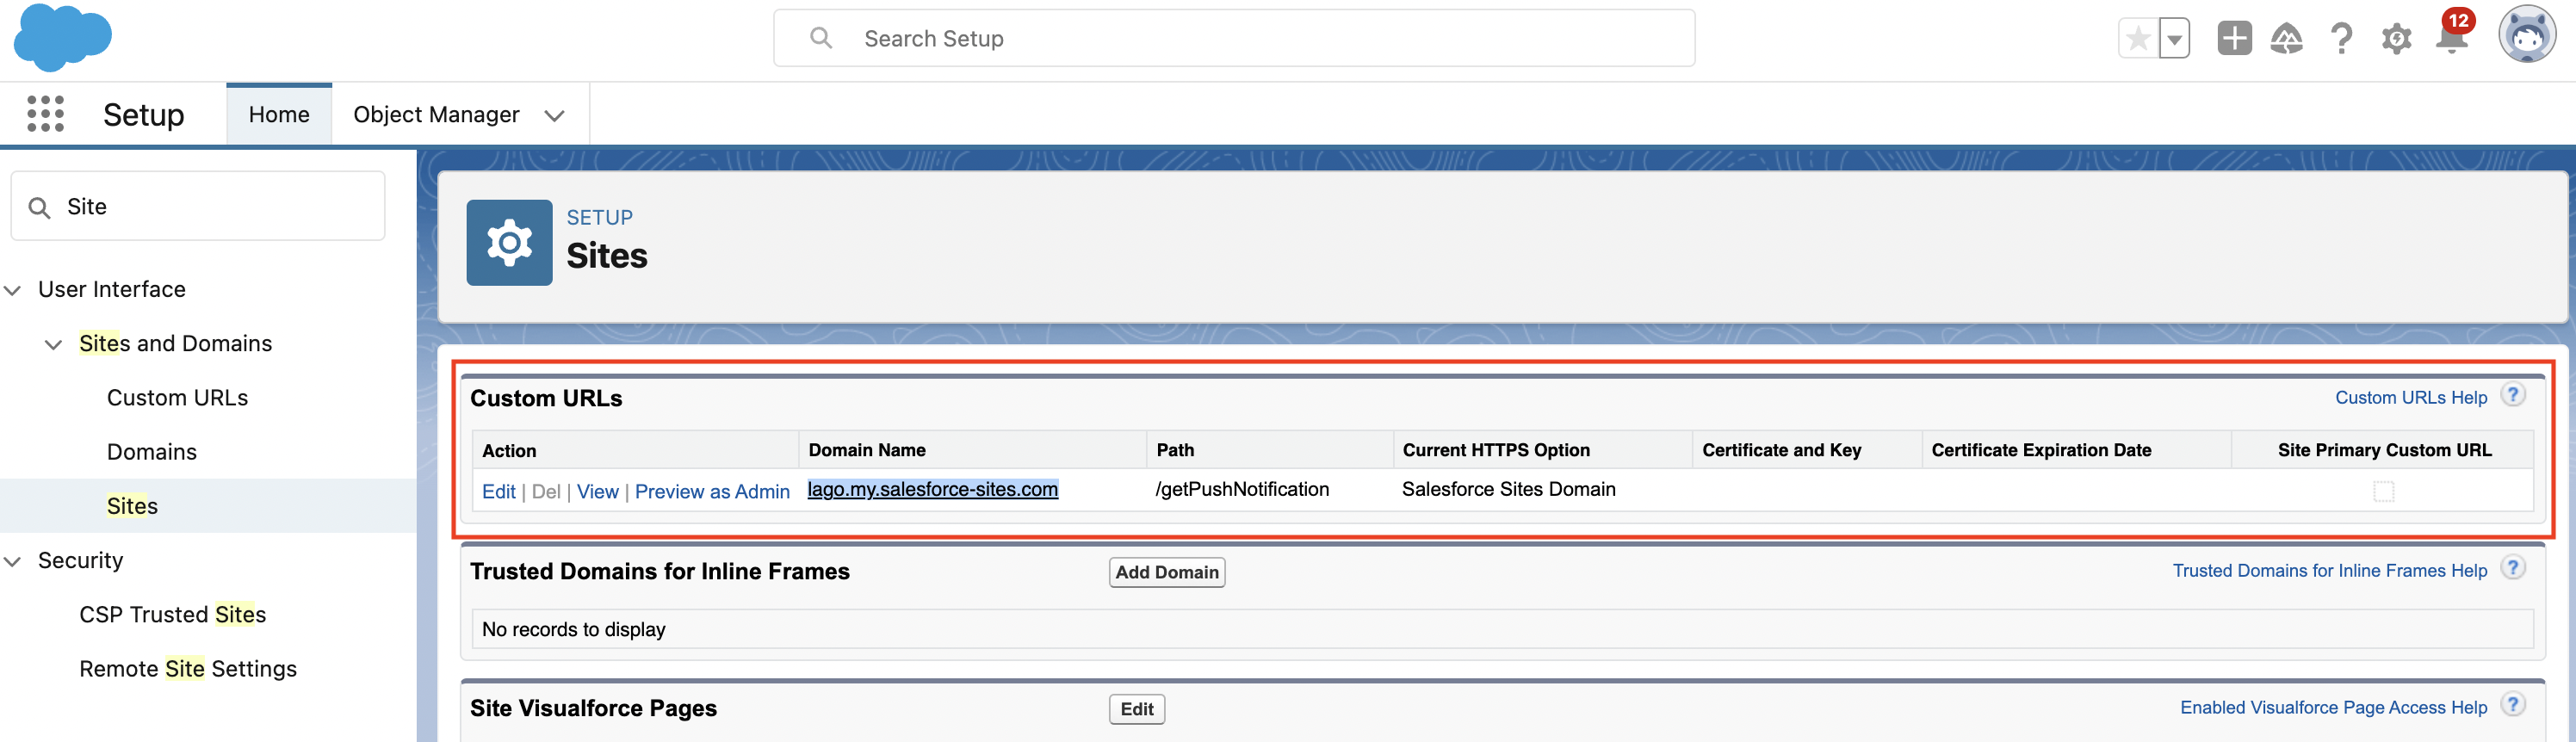
To set up the webhook URL for real-time data syncing between Lago and Salesforce, follow these steps:
1. Return to your newly created site;
2. Locate the **Custom URLs** section;
3. Copy the **domain name** *(e.g., lago.my.salesforce-sites.com)*;
4. Add the `https://` prefix to this domain name (e.g., `https://lago.my.salesforce-sites.com`); and
5. Append `/services/apexrest/lago/api/Webhooks/incoming/pushDetails/` to the domain name (e.g., `https://lago.my.salesforce-sites.com/services/apexrest/lago/api/Webhooks/incoming/pushDetails/`).
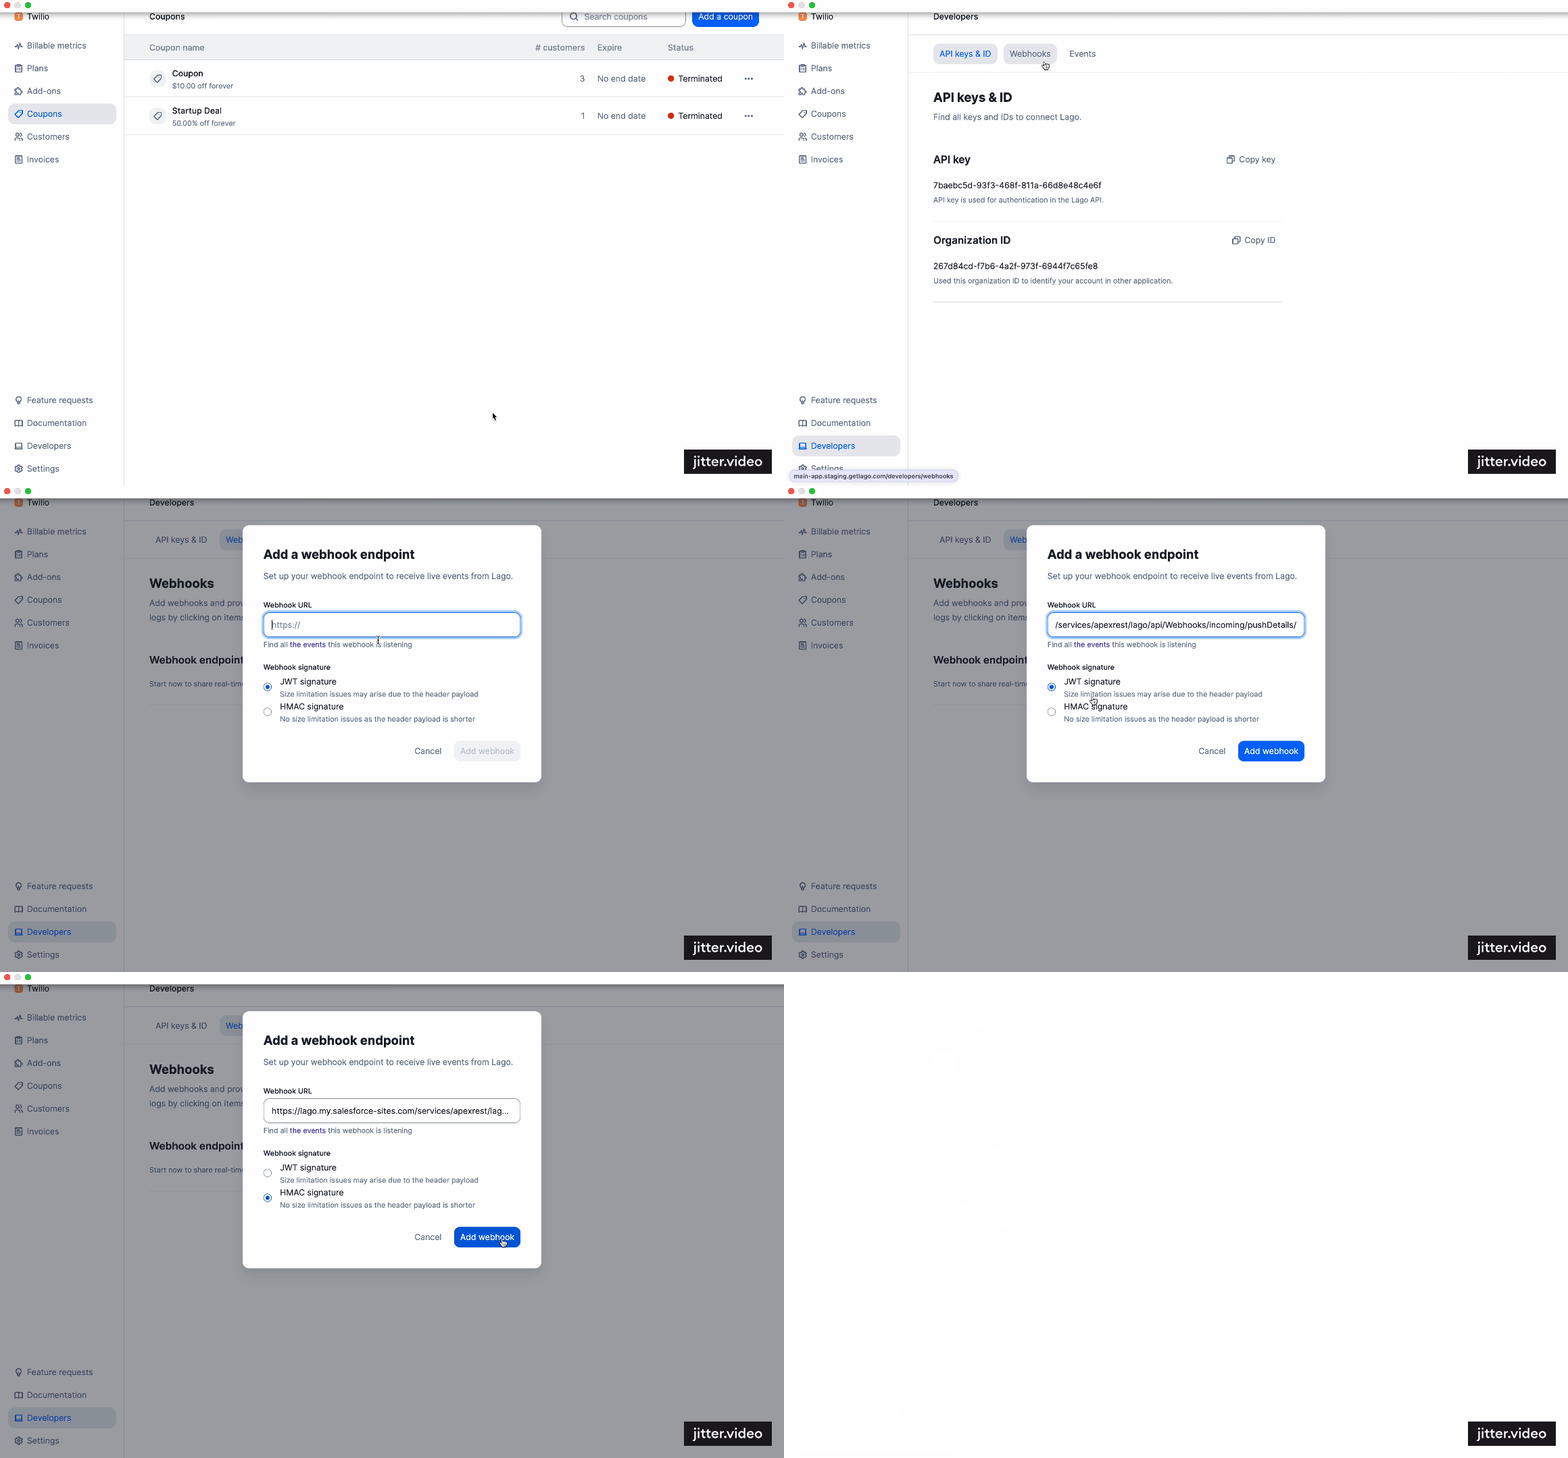
Now, go to your Lago app and past this webhook into the webhook’s settings:
1. Within Lago, navigate to **Developers**;
2. Visit the **Webhooks** tab;
3. Choose `HMAC` as the **mandatory signature type**;
4. Paste your Salesforce webhook URL; and
5. Save this webhook endpoint.
Congratulations! You're ready to sync real-time data from Lago to Salesforce! 🎉
### Establish and finalize connection
**Option 1: Configure a standard API Base URL**
To establish a connection between your Lago instance and the Salesforce Package, follow these steps:
1. Access Salesforce and locate the **App Launcher**;
2. Find and open the Lago app you recently installed;
3. Within the Lago Base Configuration tab:
* Provide your **Lago API Key** (located in Lago's Developer Section)
* Enter your Lago **API base URL**. Do not insert the `api/v1` at the end of the URL. By default, the valid URL is `https://api.getlago.com/`.
If you want to change the API base URL to another one (e.g., `https://api.eu.getlago.com/` or a custom self-hosted one), please follow option 2.
4. **"Save and validate"** your connection; and
5. Click the **"Start Sync Data"** to finalize the connection between Lago and Salesforce.
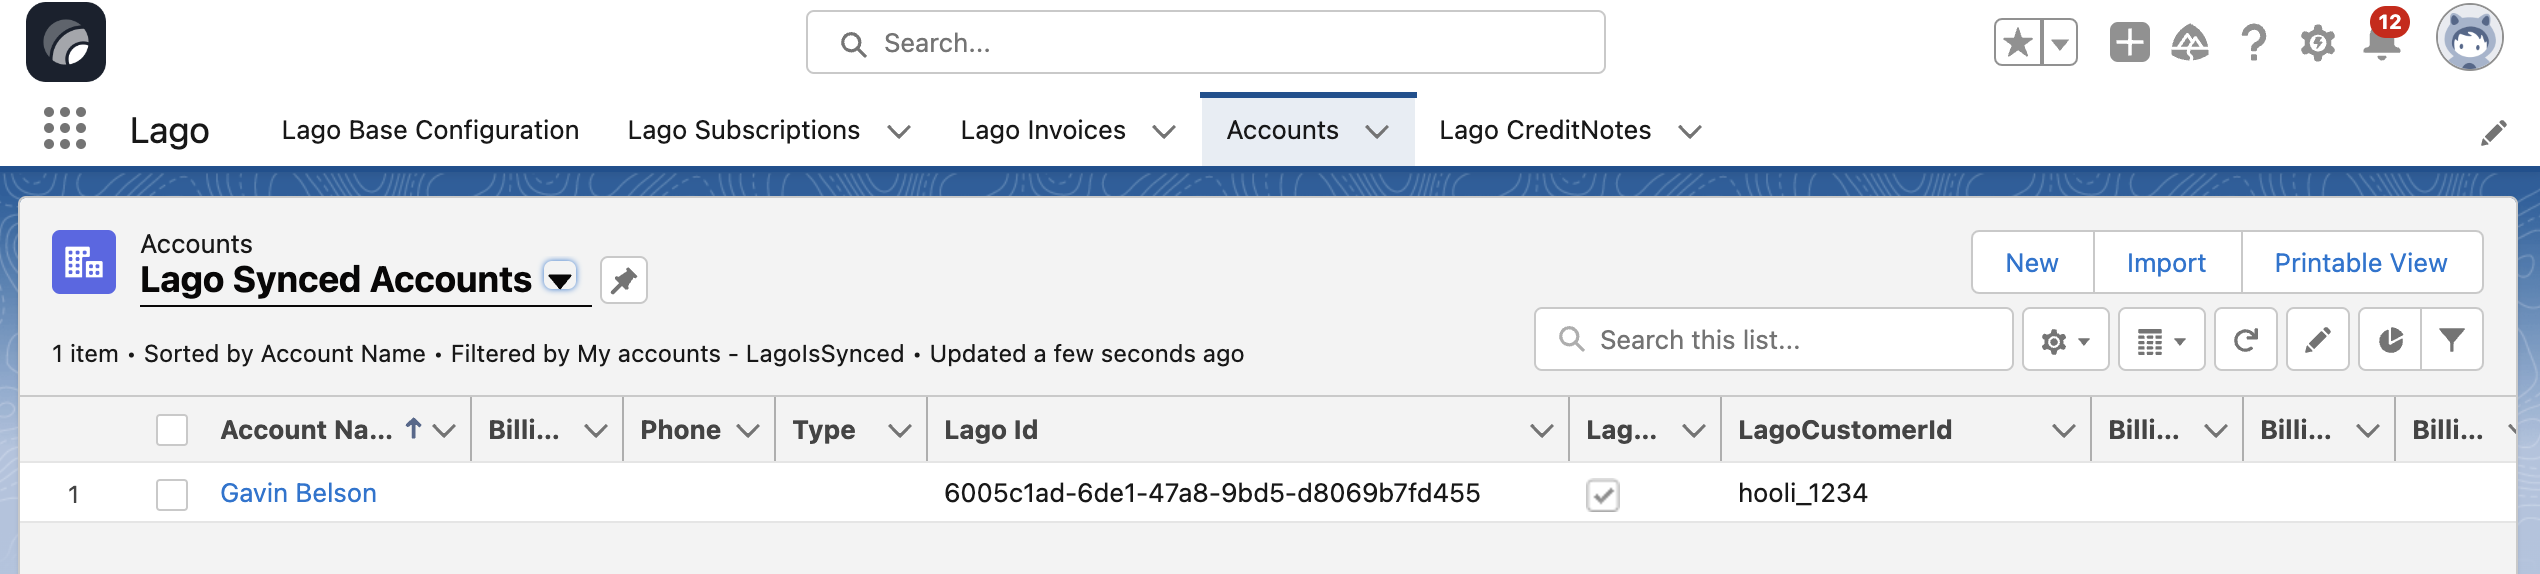
Please note that data synchronization is available only for Lago customers with an `external_salesforce_id` and an existing Salesforce Account.
**Option 2: Configure a custom API Base URL**
If you use your own Lago API base URL (self-hosting) or one for a different server instance,
you can customize it directly in Salesforce:
1. Navigate to Salesforce's Setup;
2. Search for and select Remote Site Settings;
3. Find and access the remote site for the Lago App;
4. Click the Edit button to modify the remote site's details;
5. Update the Remote Site URL with your preferred URL; and
6. Save the changes.
## II. Sync data from Lago to Salesforce
If your webhook endpoint is configured correctly, your **billing data will flow seamlessly in real-time**.
### Sync customers to Salesforce
To synchronize Lago Customer data with Salesforce Accounts (native object), ensure that your
Salesforce Account is created first, and that the Lago Customer's `external_salesforce_id` is explicitly populated.
1. Begin by creating a new Account in Salesforce or accessing an existing one;
2. Next, create a customer in Lago and populate the `external_salesforce_id` field for a Lago Customer with the Salesforce Account Id; and
3. Finally, your Salesforce Account and Lago Customer are synchronized!
Billing data will not sync unless these requirements are met.
Lago does not create Salesforce Accounts.
Before syncing billing data, you need to create or retrieve an existing Account in Salesforce
and populate the Lago customer field called `external_salesforce_id`.
### Sync subscriptions to Salesforce
Whenever a subscription is created for a Lago Customer, the subscription details will be automatically
synced in real-time with Salesforce using the `Lago Subscriptions` custom object.
Here is a list of Subscription fields that are automatically synced.
Note that this subcription is automatically linked to a Salesforce Account:
* Subscription Id;
* Subscription Name;
* Subscription Start Date;
* Subscription Status;
* Subscription Termination Date (synced when the subscription is terminated);
* Subscription Billing Time (either `calendar` or `anniversary`); and
* Plan Code.
### Sync invoices to Salesforce
Whenever an invoice is issued for a Lago Customer, the invoice details will be automatically
synced in real-time with Salesforce using the `Lago Invoices` custom object.
Here is a list of Subscription fields that are automatically synced:
* Invoices Number;
* Invoice Payment Status;
* Invoice Type (`subscription` or `one-off`);
* Invoice Issuing Date;
* Invoice Amount;
* Invoice File Url; and
* Invoice Currency.
### Sync credit notes to Salesforce
Whenever a credit note is issued for a Lago Invoice, the credit note details will be automatically
synced in real-time with Salesforce using the `Lago CreditNotes` custom object.
## III. Actions from Salesforce to Lago
Beyond just syncing data from Lago to Salesforce, you can also initiate actions in Lago directly from Salesforce.
You can leverage Salesforce `Flows` to execute actions in Lago. Lago provides two customizable templates for creating customers from Salesforce Accounts
and directly assigning subscriptions to customers from Salesforce.
### Flow 1: Create customers
To create a customer in Lago upon the creation of a Salesforce Account, utilize the Flow template provided by Lago.
1. Log into your Salesforce instance;
2. Access the Setup section via the settings wheel icon in Salesforce;
3. Find and select `Flows` under Process Automation in the sidebar;
4. Locate and open the `Lago Template - Create Customer in Lago on Account Create`;
5. Click 'Save As' to create and save your own version of the template; and
6. Do not forget to click the `Activate` button to activate your flow.
You have the **flexibility to modify various aspects of this flow, including the trigger conditions and field mappings**.
By default, the action is initiated when a Lago ID is absent. Additionally, you can customize how fields are mapped from your Salesforce instance to Lago.
### Flow 2: Create subscriptions
Assigning a plan to a customer, adjusting negotiated prices, and initiating the subscription upon winning an opportunity represents a key action from Salesforce to Lago.
This enables sales teams to remain within Salesforce, their primary tool, and activate billing processes directly, without the need to switch platforms.
To assign a subscription and set prices in Lago directly from Salesforce, use the provided Lago Flow template.
1. Log into your Salesforce instance;
2. Access the Setup section via the settings wheel icon in Salesforce;
3. Find and select `Flows` under Process Automation in the sidebar;
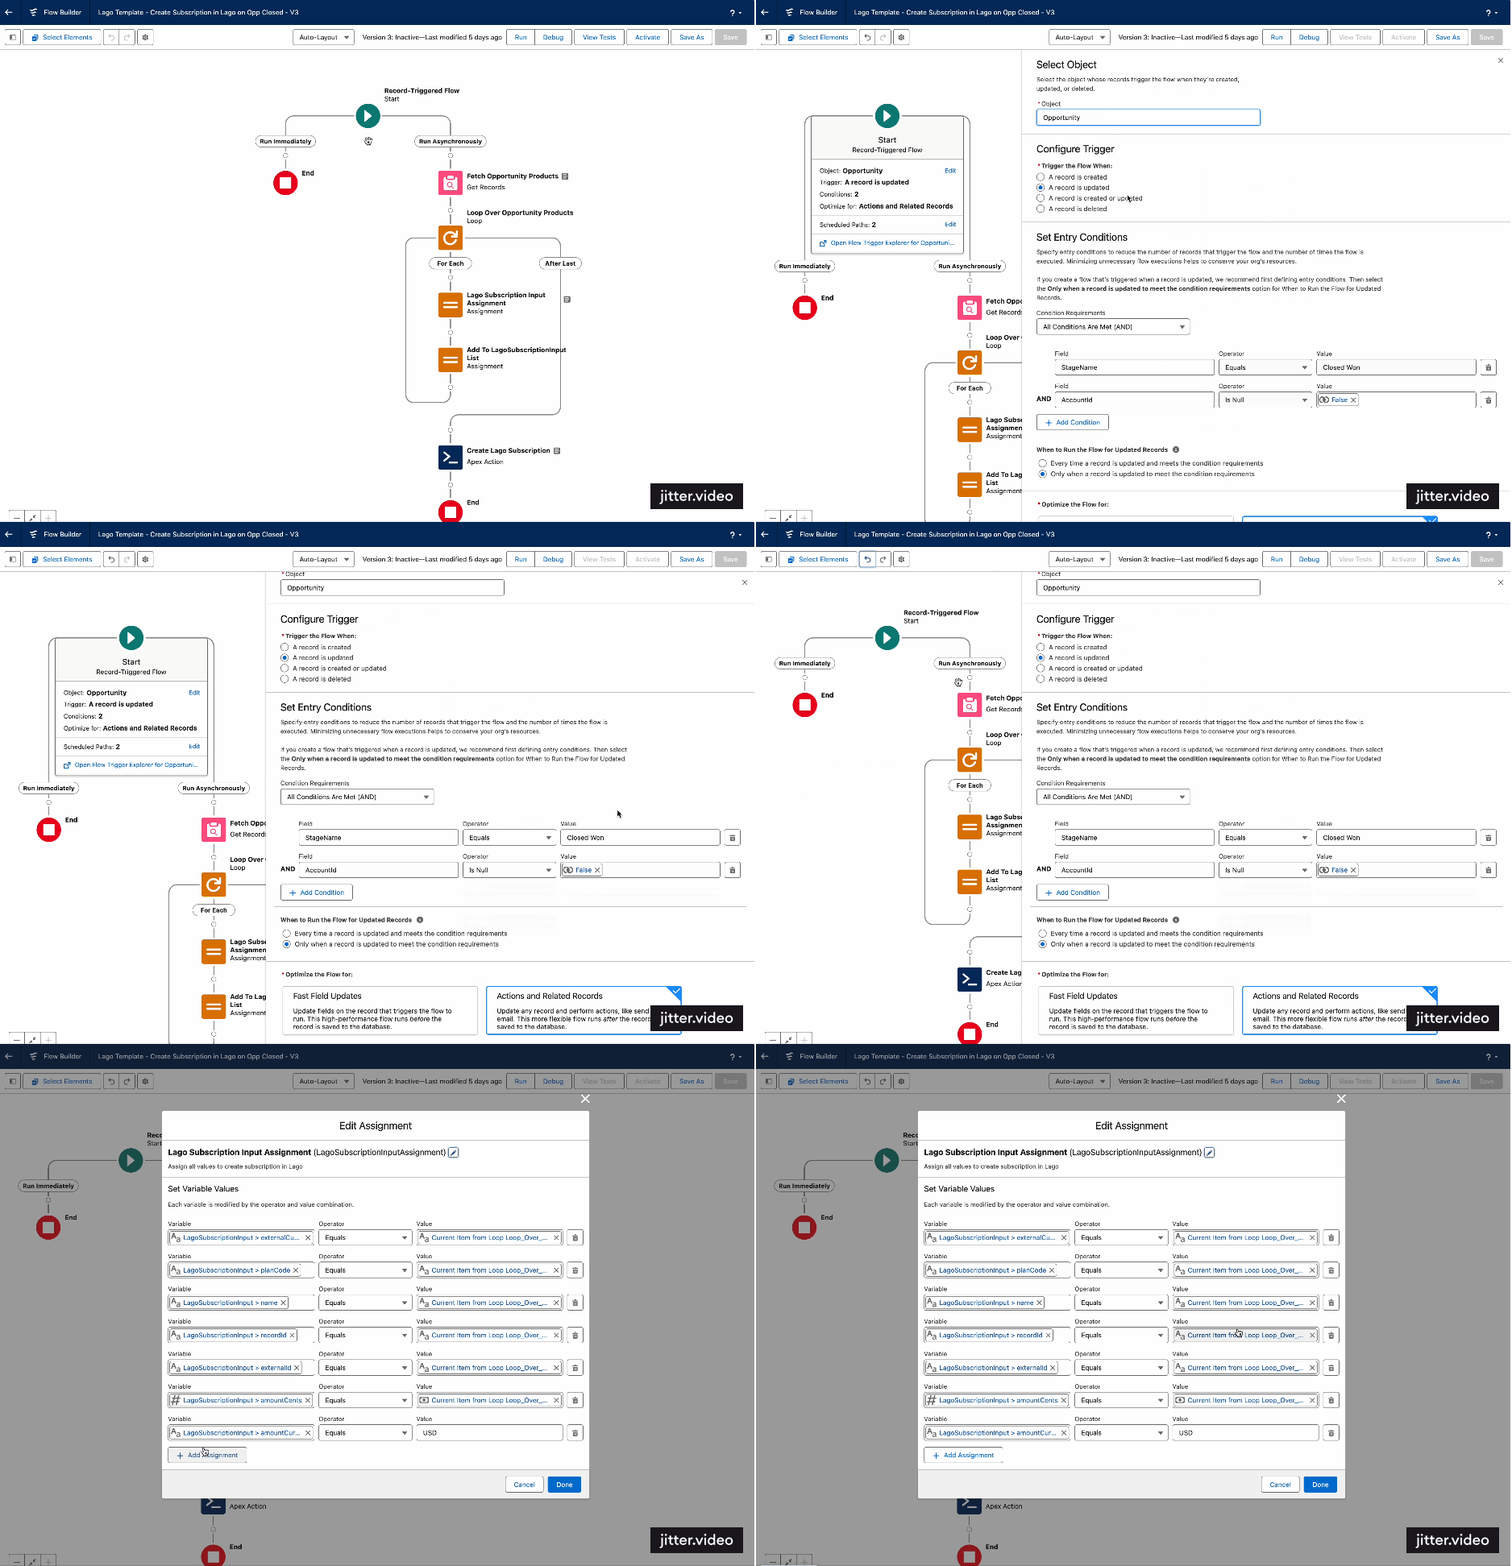
4. Locate and open the `Lago Template - Create Subscription in Lago on Opp Closed`;
5. Click 'Save As' to create and save your own version of the template; and
6. Do not forget to click the `Activate` button to activate your flow.
The default setting triggers plan assignment when a Salesforce Account links to a Lago customer and the **opportunity status changes to closed-won**.
You can customize this flow to suit your specific needs. Moreover, you have the option to adjust the subscription fields being synchronized from Salesforce to Lago.
1. Create an opportunity by assigning an expected closed date and a stage;
2. Add a Lago plan to this opportunity **as a product** (Salesforce will automatically retrieve all plans from Lago in `Standard Price Book`);
3. Specify `1` for the quantity of the plan;
4. Use the custom UI to either assign this plan directly or to override prices; and
5. Click on 'Lago Override Plan' to finalize the subscription assignment.
By default, the subscription is created when the opportunity is `closed-won`. You can assign multiple subscriptions for the same opportunity.
## Debugging & logs
To ensure seamless data synchronization between Lago and Salesforce, every action and data transfer is meticulously logged.
These logs are accessible directly through the Lago package for comprehensive debugging and analysis:
1. Navigate to 'Lago Base Configuration': This is your starting point for accessing the debugging tools. and
2. Access Logs: Click on the 'Logs' tab to view a detailed record of all activities.
You can refresh logs to keep your data current or delete unnecessary logs to maintain clarity and efficiency in the debugging process.
This approach aids in promptly identifying and resolving integration issues.
 ## I. Integration configuration
### Install Salesforce CRM Package
To gain premium access to our Salesforce Package application, please don't hesitate to contact us.
You can initiate the installation process **by clicking on the provided link**, which will direct you to the installation
page where you can follow step-by-step instructions for a seamless integration. If you have any questions or need assistance
during the installation, our dedicated support team is here to help you every step of the way.
## I. Integration configuration
### Install Salesforce CRM Package
To gain premium access to our Salesforce Package application, please don't hesitate to contact us.
You can initiate the installation process **by clicking on the provided link**, which will direct you to the installation
page where you can follow step-by-step instructions for a seamless integration. If you have any questions or need assistance
during the installation, our dedicated support team is here to help you every step of the way.
 To ensure a successful installation, please follow these steps:
1. We recommend selecting the **"Install for all users"** option;
2. Click on the **"Install" button**;
3. Make sure to **check the box to grant access to these third-party websites**; and
4. Once completed, you'll have **successfully installed** the Lago Salesforce App.
To ensure a successful installation, please follow these steps:
1. We recommend selecting the **"Install for all users"** option;
2. Click on the **"Install" button**;
3. Make sure to **check the box to grant access to these third-party websites**; and
4. Once completed, you'll have **successfully installed** the Lago Salesforce App.
 Now, go to your Lago app and past this webhook into the webhook’s settings:
1. Within Lago, navigate to **Developers**;
2. Visit the **Webhooks** tab;
3. Choose `HMAC` as the **mandatory signature type**;
4. Paste your Salesforce webhook URL; and
5. Save this webhook endpoint.
Congratulations! You're ready to sync real-time data from Lago to Salesforce! 🎉
Now, go to your Lago app and past this webhook into the webhook’s settings:
1. Within Lago, navigate to **Developers**;
2. Visit the **Webhooks** tab;
3. Choose `HMAC` as the **mandatory signature type**;
4. Paste your Salesforce webhook URL; and
5. Save this webhook endpoint.
Congratulations! You're ready to sync real-time data from Lago to Salesforce! 🎉
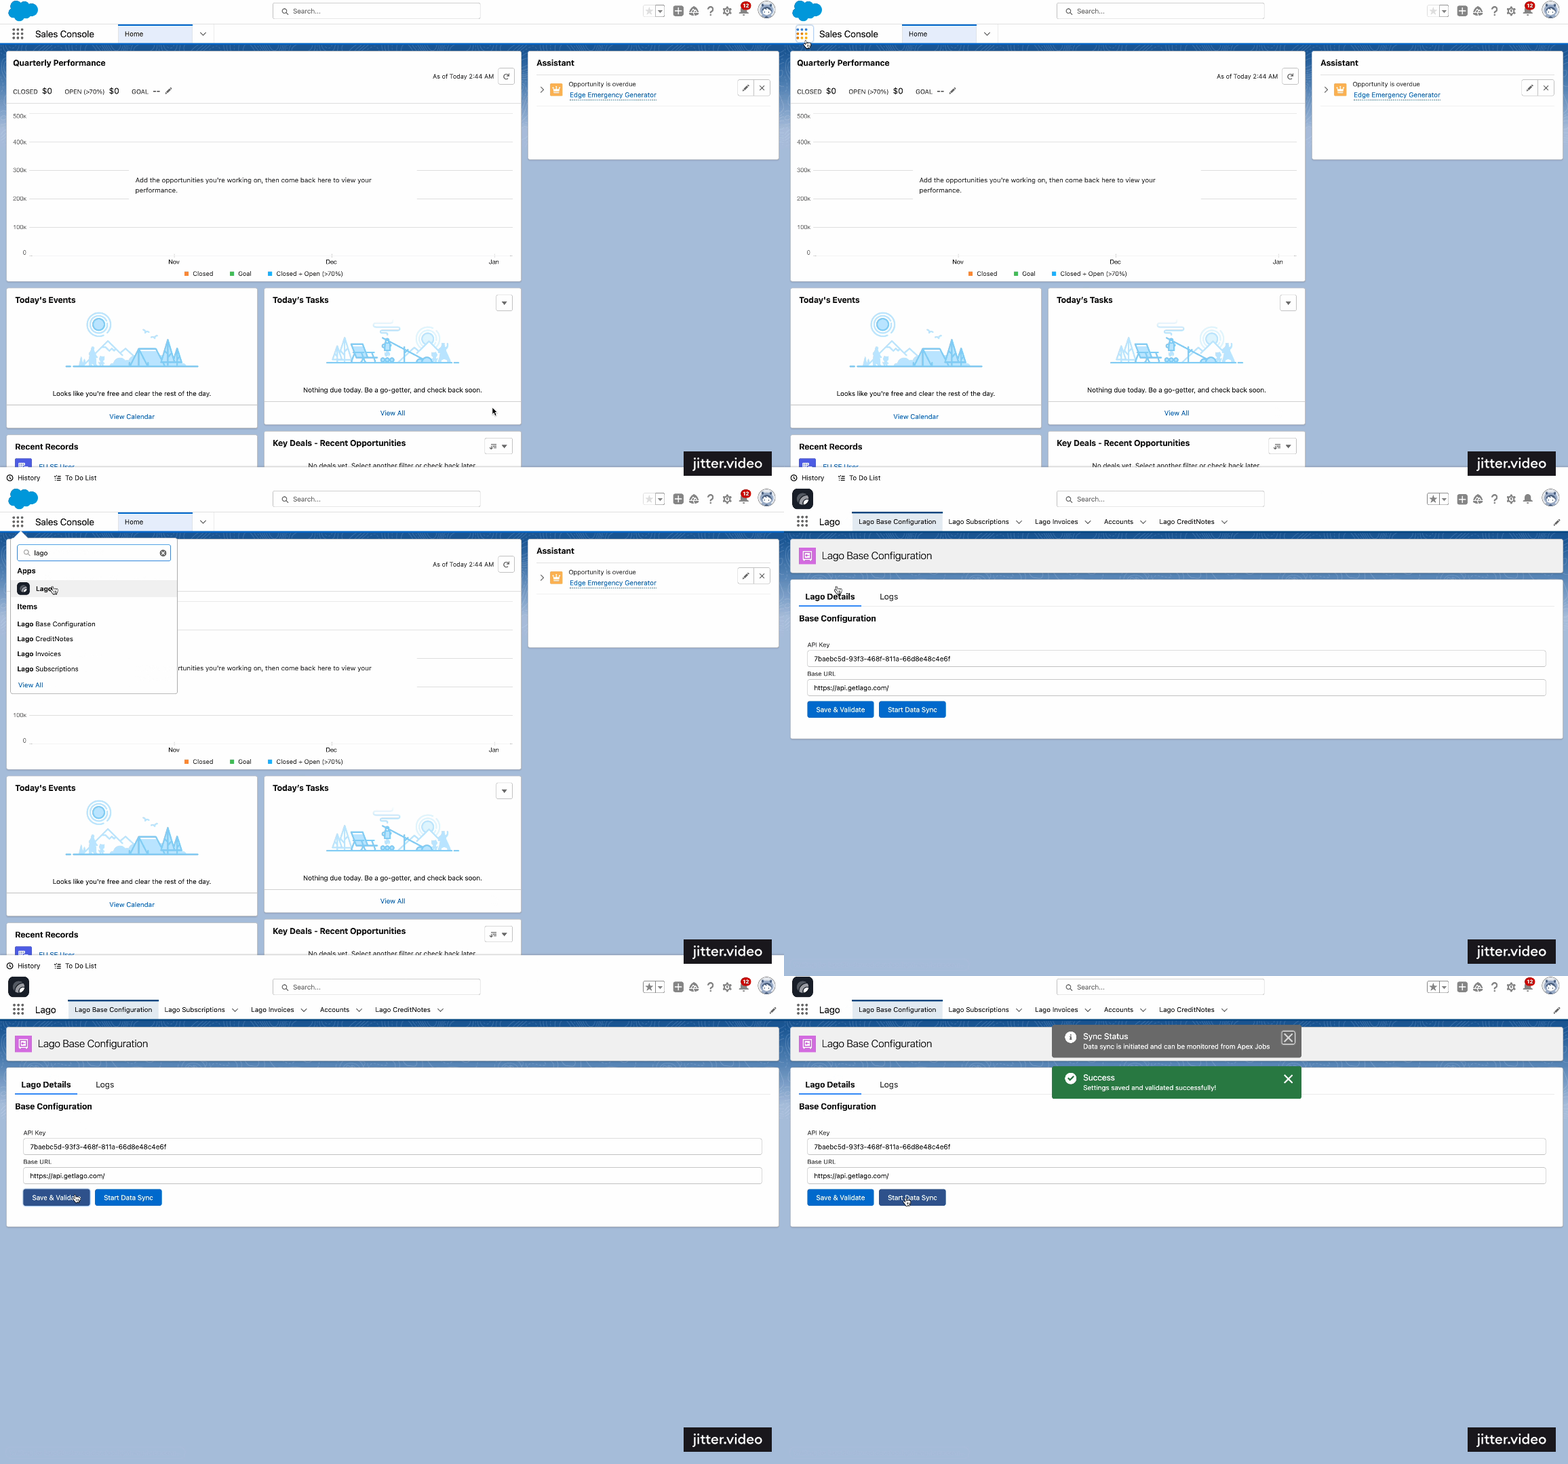 **Option 1: Configure a standard API Base URL**
To establish a connection between your Lago instance and the Salesforce Package, follow these steps:
1. Access Salesforce and locate the **App Launcher**;
2. Find and open the Lago app you recently installed;
3. Within the Lago Base Configuration tab:
* Provide your **Lago API Key** (located in Lago's Developer Section)
* Enter your Lago **API base URL**. Do not insert the `api/v1` at the end of the URL. By default, the valid URL is `https://api.getlago.com/`.
If you want to change the API base URL to another one (e.g., `https://api.eu.getlago.com/` or a custom self-hosted one), please follow option 2.
4. **"Save and validate"** your connection; and
5. Click the **"Start Sync Data"** to finalize the connection between Lago and Salesforce.
**Option 1: Configure a standard API Base URL**
To establish a connection between your Lago instance and the Salesforce Package, follow these steps:
1. Access Salesforce and locate the **App Launcher**;
2. Find and open the Lago app you recently installed;
3. Within the Lago Base Configuration tab:
* Provide your **Lago API Key** (located in Lago's Developer Section)
* Enter your Lago **API base URL**. Do not insert the `api/v1` at the end of the URL. By default, the valid URL is `https://api.getlago.com/`.
If you want to change the API base URL to another one (e.g., `https://api.eu.getlago.com/` or a custom self-hosted one), please follow option 2.
4. **"Save and validate"** your connection; and
5. Click the **"Start Sync Data"** to finalize the connection between Lago and Salesforce.
 ### Sync subscriptions to Salesforce
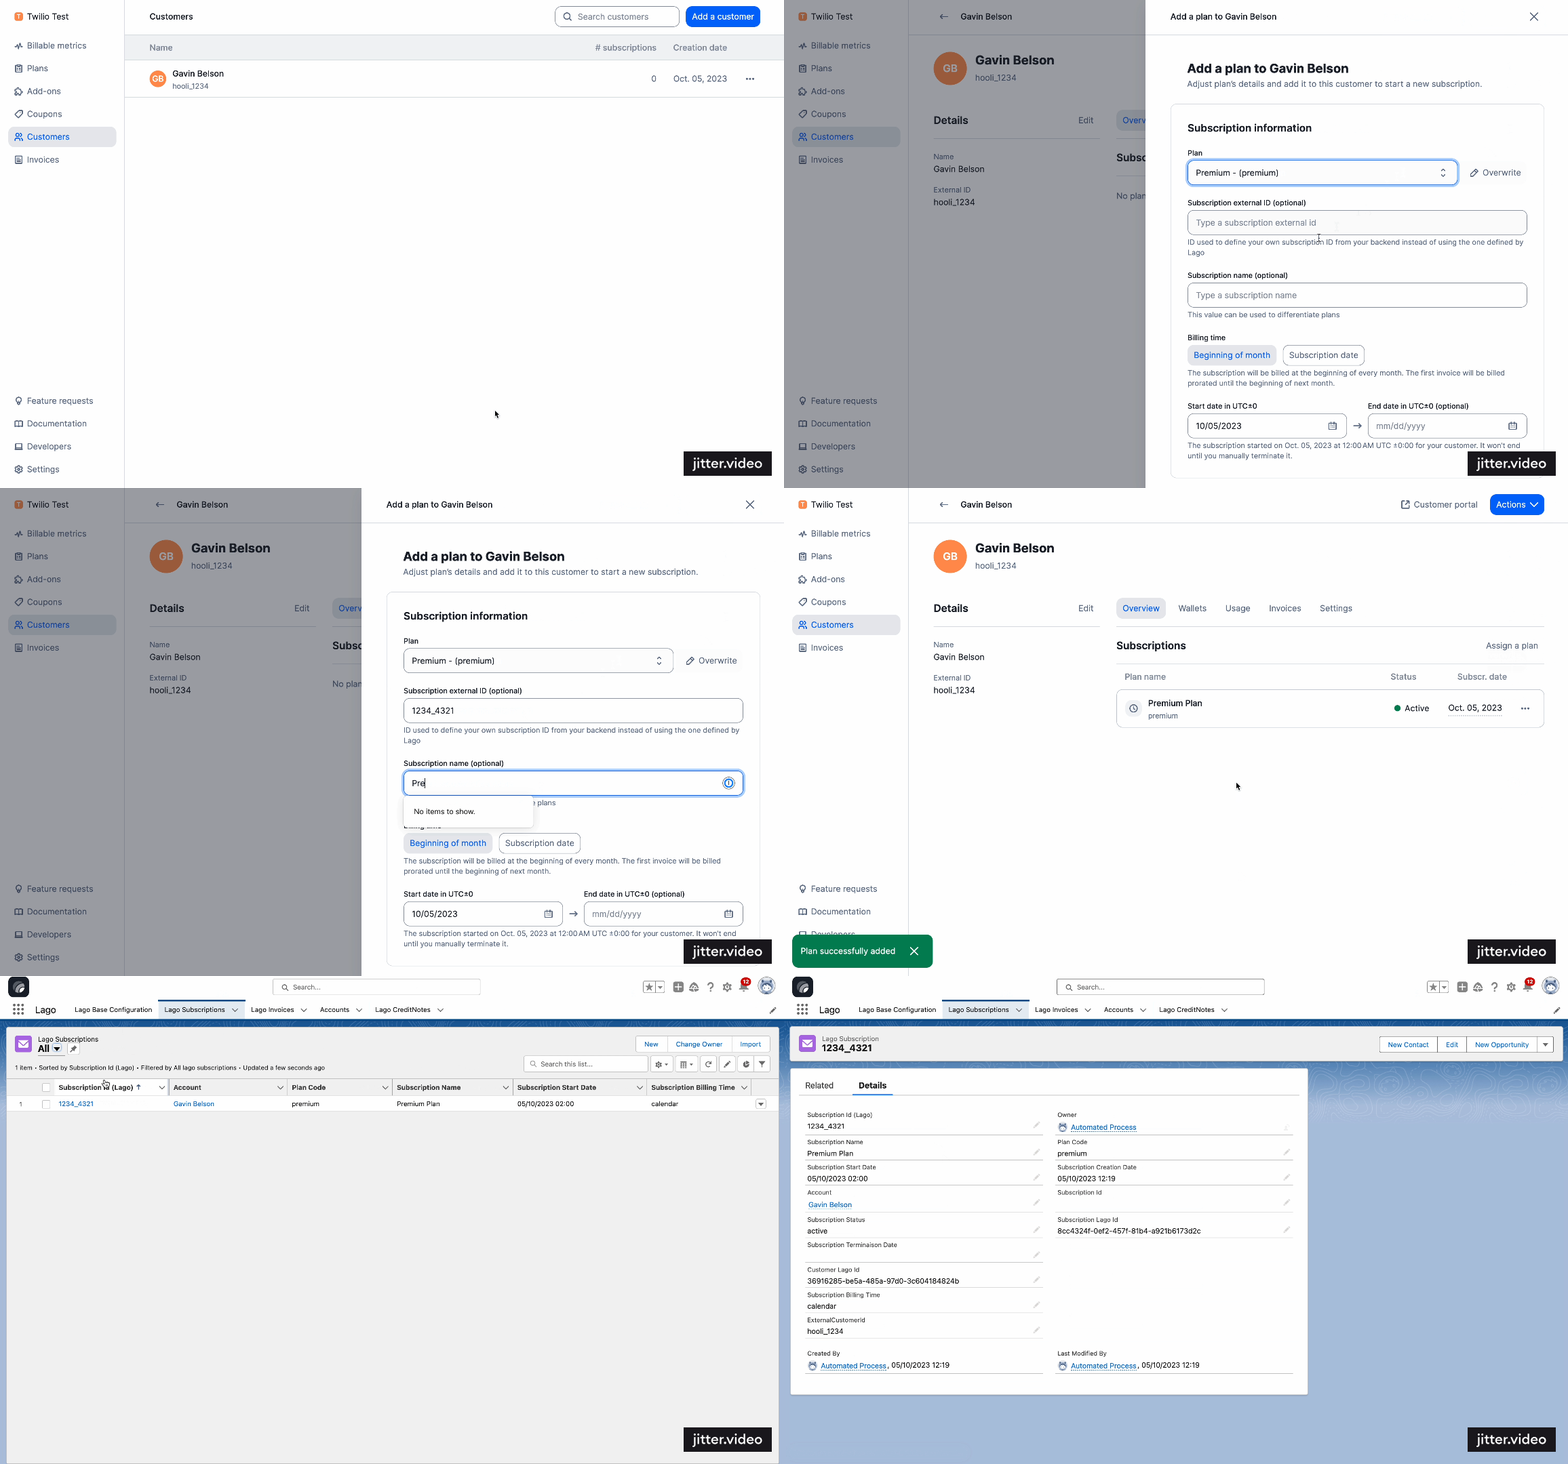 Whenever a subscription is created for a Lago Customer, the subscription details will be automatically
synced in real-time with Salesforce using the `Lago Subscriptions` custom object.
Here is a list of Subscription fields that are automatically synced.
Note that this subcription is automatically linked to a Salesforce Account:
* Subscription Id;
* Subscription Name;
* Subscription Start Date;
* Subscription Status;
* Subscription Termination Date (synced when the subscription is terminated);
* Subscription Billing Time (either `calendar` or `anniversary`); and
* Plan Code.
### Sync invoices to Salesforce
Whenever a subscription is created for a Lago Customer, the subscription details will be automatically
synced in real-time with Salesforce using the `Lago Subscriptions` custom object.
Here is a list of Subscription fields that are automatically synced.
Note that this subcription is automatically linked to a Salesforce Account:
* Subscription Id;
* Subscription Name;
* Subscription Start Date;
* Subscription Status;
* Subscription Termination Date (synced when the subscription is terminated);
* Subscription Billing Time (either `calendar` or `anniversary`); and
* Plan Code.
### Sync invoices to Salesforce
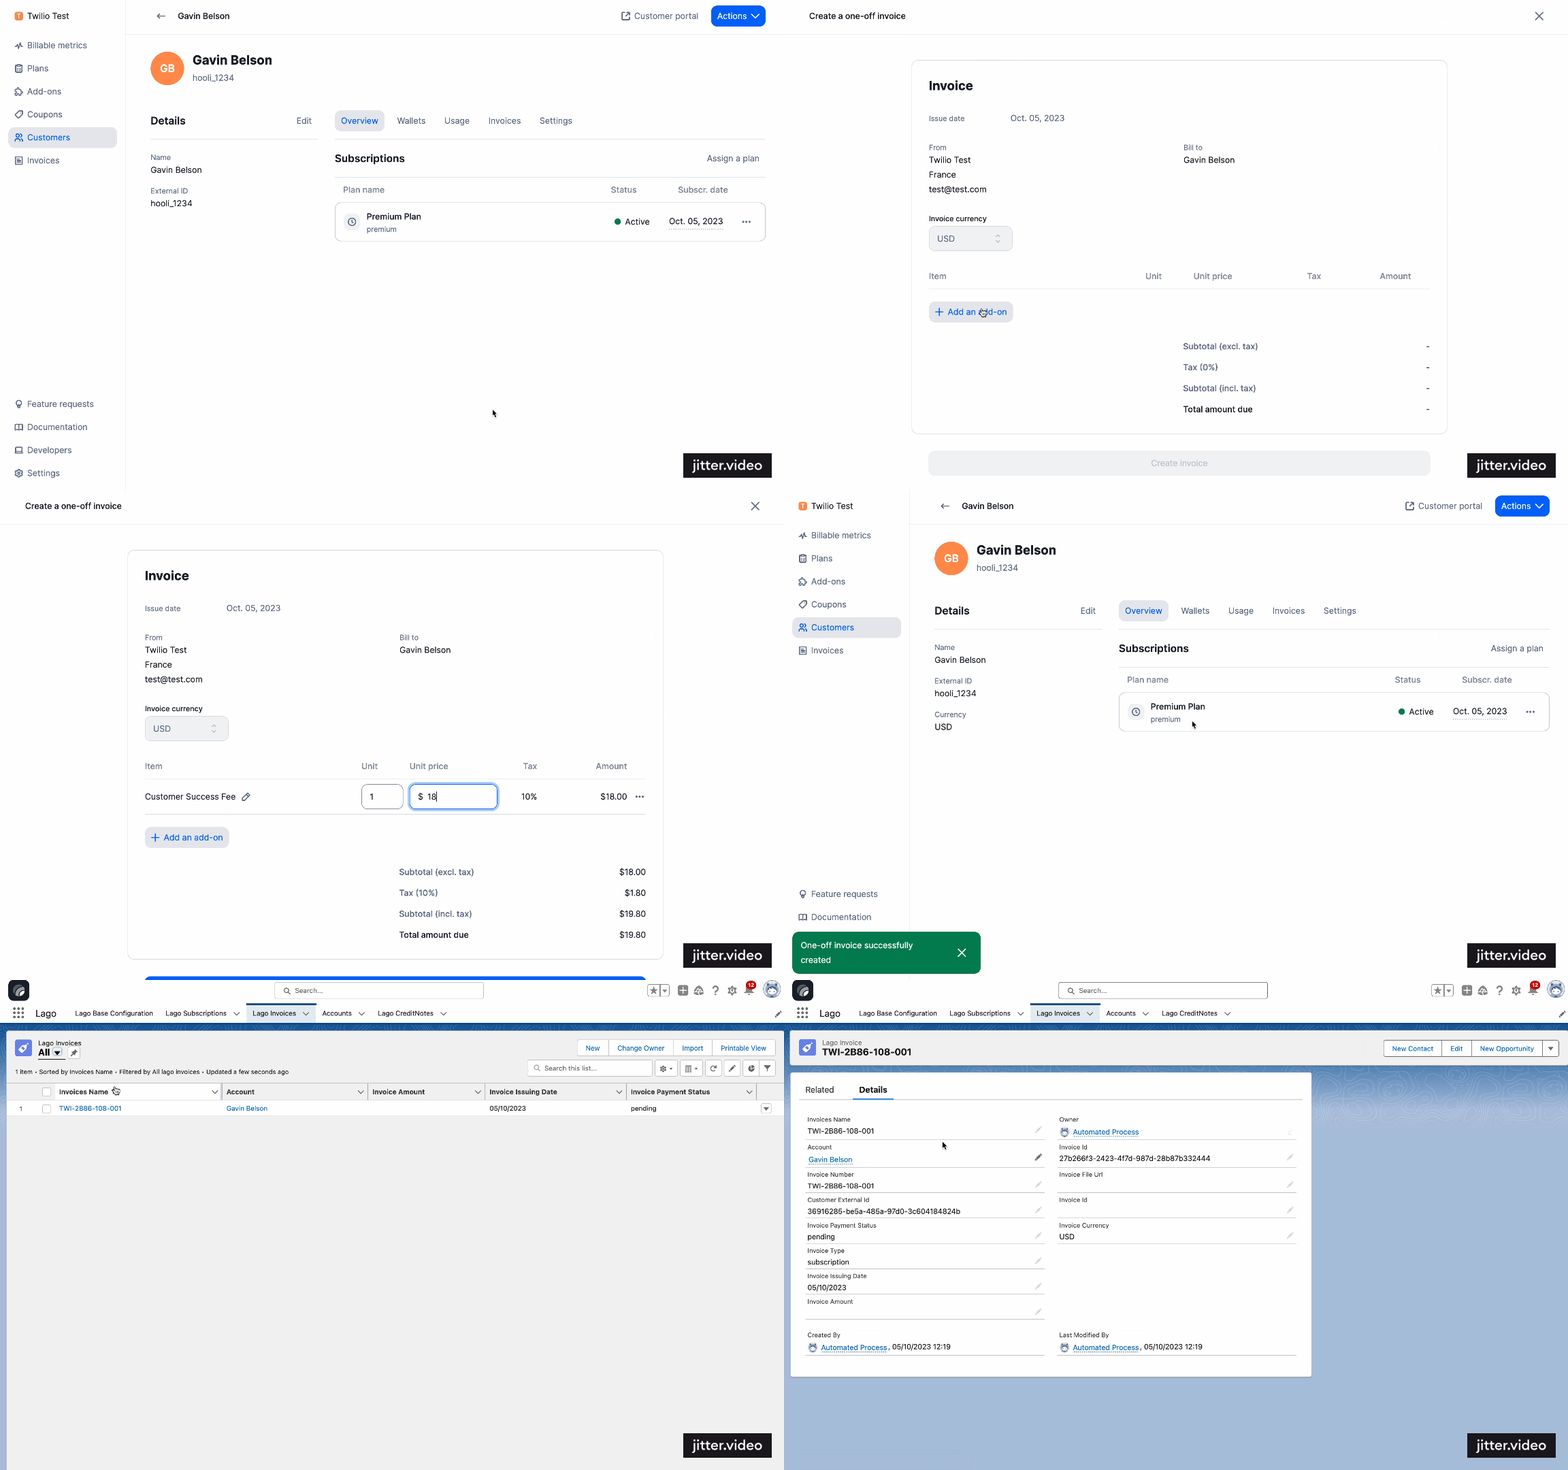 Whenever an invoice is issued for a Lago Customer, the invoice details will be automatically
synced in real-time with Salesforce using the `Lago Invoices` custom object.
Here is a list of Subscription fields that are automatically synced:
* Invoices Number;
* Invoice Payment Status;
* Invoice Type (`subscription` or `one-off`);
* Invoice Issuing Date;
* Invoice Amount;
* Invoice File Url; and
* Invoice Currency.
### Sync credit notes to Salesforce
Whenever a credit note is issued for a Lago Invoice, the credit note details will be automatically
synced in real-time with Salesforce using the `Lago CreditNotes` custom object.
## III. Actions from Salesforce to Lago
Beyond just syncing data from Lago to Salesforce, you can also initiate actions in Lago directly from Salesforce.
You can leverage Salesforce `Flows` to execute actions in Lago. Lago provides two customizable templates for creating customers from Salesforce Accounts
and directly assigning subscriptions to customers from Salesforce.
### Flow 1: Create customers
Whenever an invoice is issued for a Lago Customer, the invoice details will be automatically
synced in real-time with Salesforce using the `Lago Invoices` custom object.
Here is a list of Subscription fields that are automatically synced:
* Invoices Number;
* Invoice Payment Status;
* Invoice Type (`subscription` or `one-off`);
* Invoice Issuing Date;
* Invoice Amount;
* Invoice File Url; and
* Invoice Currency.
### Sync credit notes to Salesforce
Whenever a credit note is issued for a Lago Invoice, the credit note details will be automatically
synced in real-time with Salesforce using the `Lago CreditNotes` custom object.
## III. Actions from Salesforce to Lago
Beyond just syncing data from Lago to Salesforce, you can also initiate actions in Lago directly from Salesforce.
You can leverage Salesforce `Flows` to execute actions in Lago. Lago provides two customizable templates for creating customers from Salesforce Accounts
and directly assigning subscriptions to customers from Salesforce.
### Flow 1: Create customers
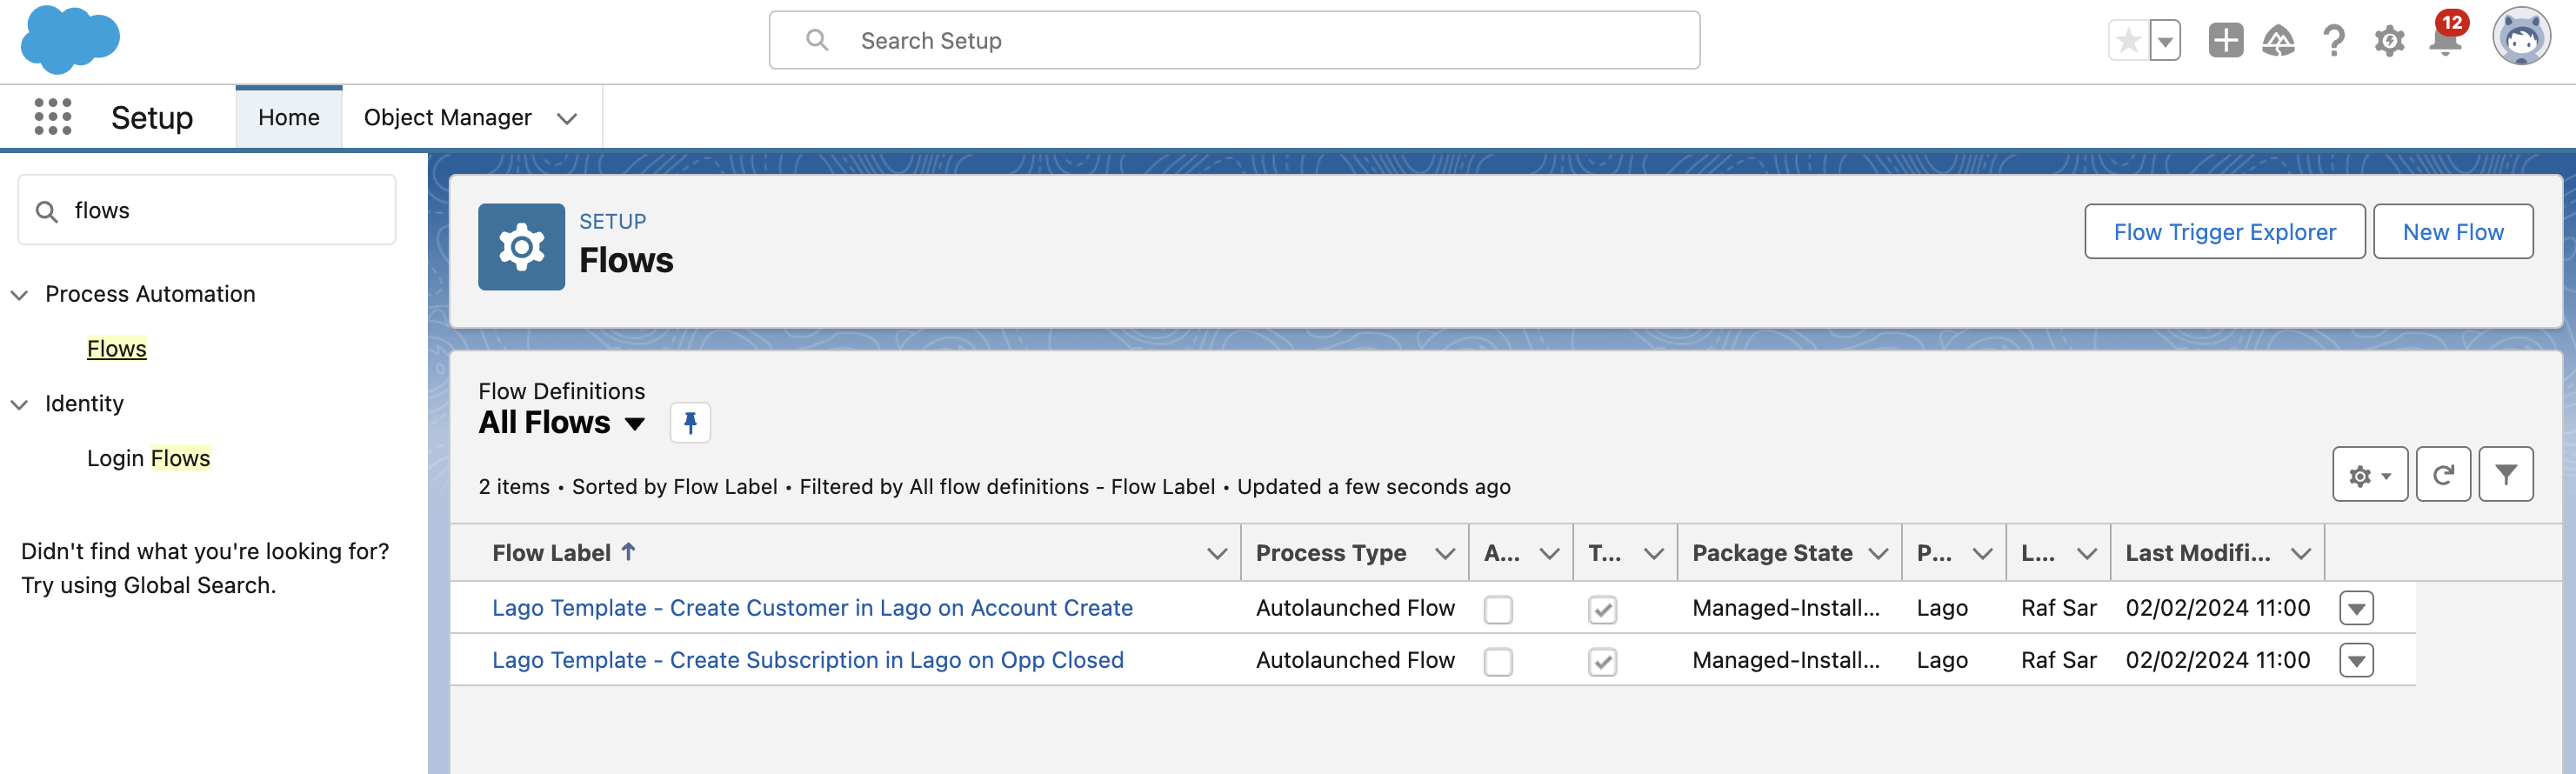 To create a customer in Lago upon the creation of a Salesforce Account, utilize the Flow template provided by Lago.
1. Log into your Salesforce instance;
2. Access the Setup section via the settings wheel icon in Salesforce;
3. Find and select `Flows` under Process Automation in the sidebar;
4. Locate and open the `Lago Template - Create Customer in Lago on Account Create`;
5. Click 'Save As' to create and save your own version of the template; and
6. Do not forget to click the `Activate` button to activate your flow.
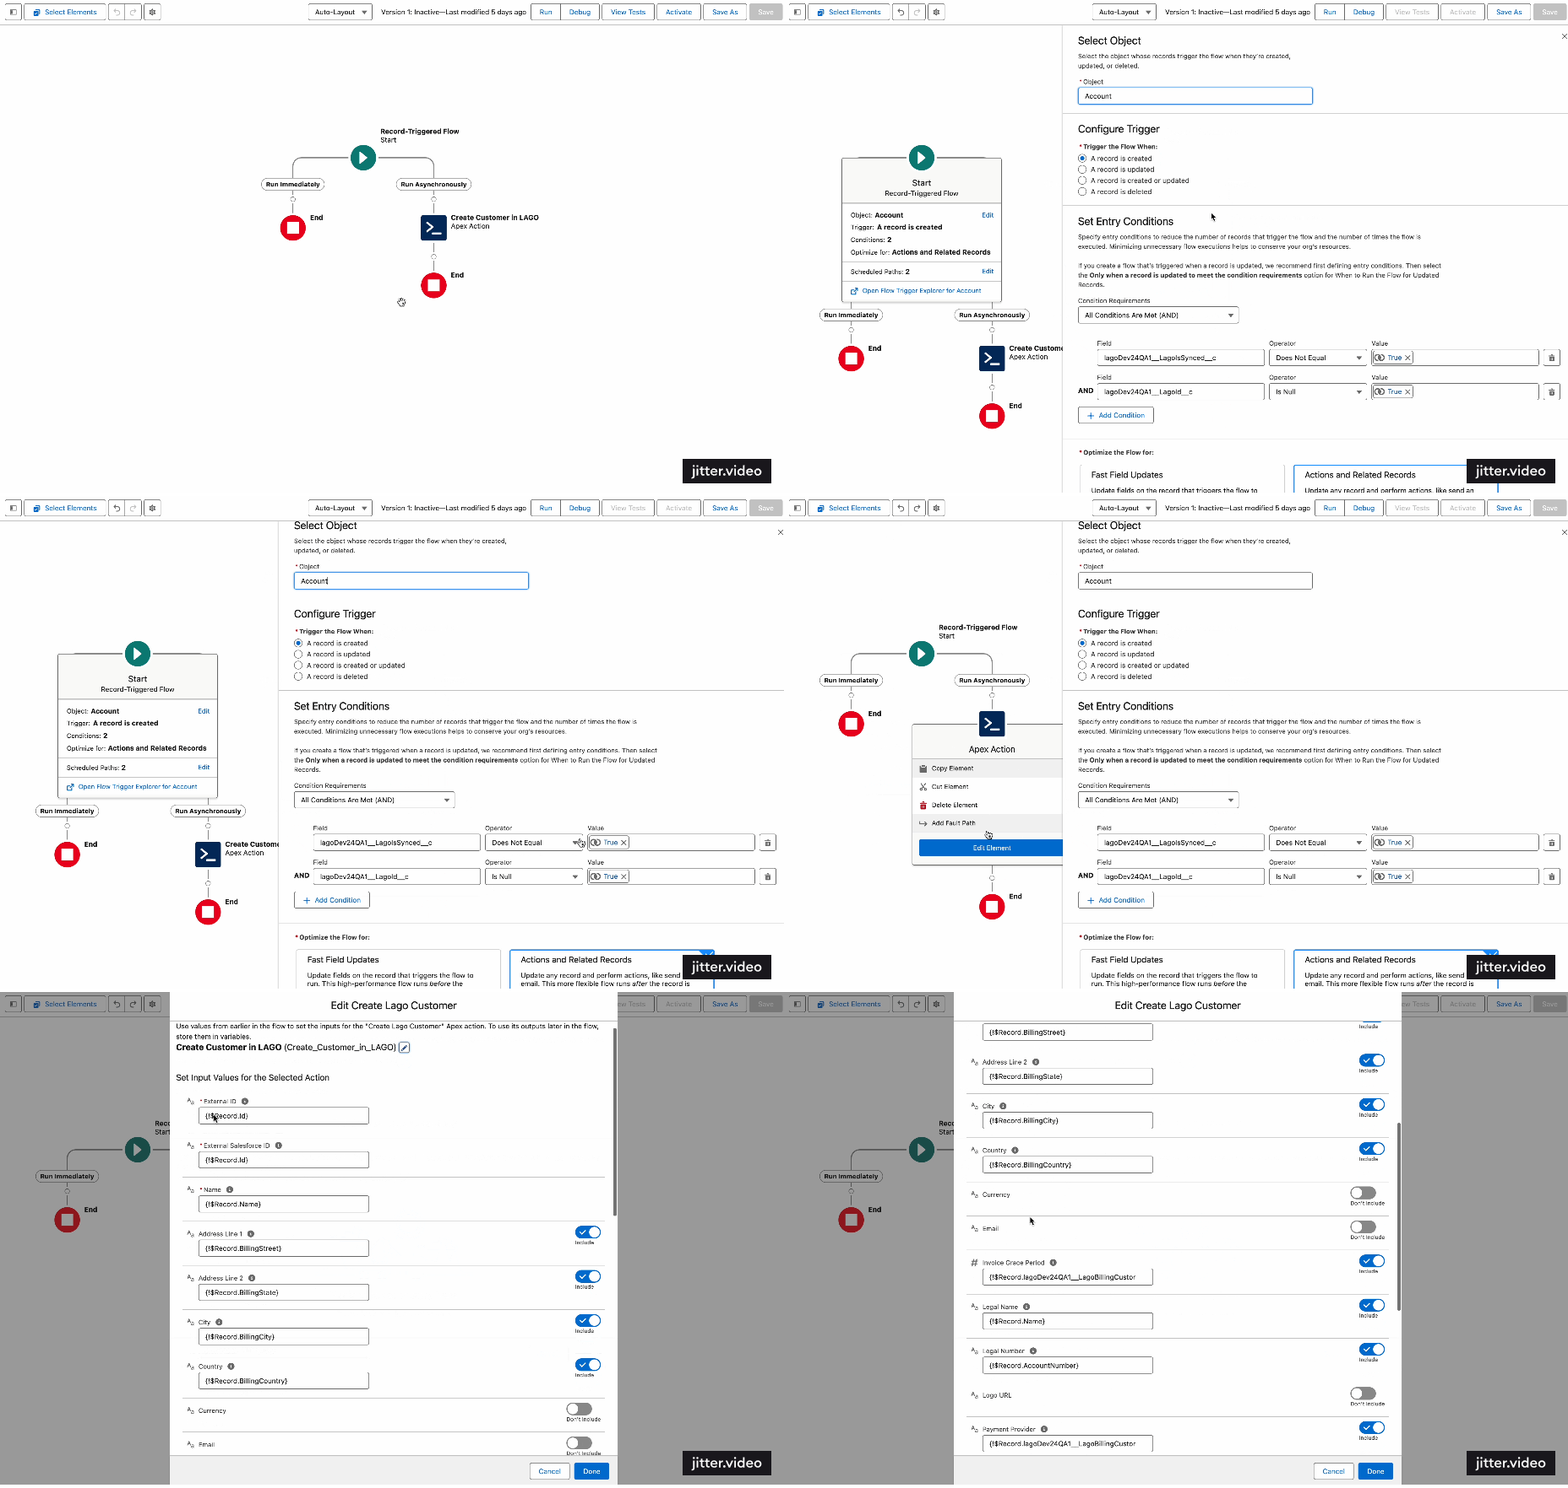
You have the **flexibility to modify various aspects of this flow, including the trigger conditions and field mappings**.
By default, the action is initiated when a Lago ID is absent. Additionally, you can customize how fields are mapped from your Salesforce instance to Lago.
To create a customer in Lago upon the creation of a Salesforce Account, utilize the Flow template provided by Lago.
1. Log into your Salesforce instance;
2. Access the Setup section via the settings wheel icon in Salesforce;
3. Find and select `Flows` under Process Automation in the sidebar;
4. Locate and open the `Lago Template - Create Customer in Lago on Account Create`;
5. Click 'Save As' to create and save your own version of the template; and
6. Do not forget to click the `Activate` button to activate your flow.
You have the **flexibility to modify various aspects of this flow, including the trigger conditions and field mappings**.
By default, the action is initiated when a Lago ID is absent. Additionally, you can customize how fields are mapped from your Salesforce instance to Lago.
 ### Flow 2: Create subscriptions
Assigning a plan to a customer, adjusting negotiated prices, and initiating the subscription upon winning an opportunity represents a key action from Salesforce to Lago.
This enables sales teams to remain within Salesforce, their primary tool, and activate billing processes directly, without the need to switch platforms.
To assign a subscription and set prices in Lago directly from Salesforce, use the provided Lago Flow template.
1. Log into your Salesforce instance;
2. Access the Setup section via the settings wheel icon in Salesforce;
3. Find and select `Flows` under Process Automation in the sidebar;
4. Locate and open the `Lago Template - Create Subscription in Lago on Opp Closed`;
5. Click 'Save As' to create and save your own version of the template; and
6. Do not forget to click the `Activate` button to activate your flow.
### Flow 2: Create subscriptions
Assigning a plan to a customer, adjusting negotiated prices, and initiating the subscription upon winning an opportunity represents a key action from Salesforce to Lago.
This enables sales teams to remain within Salesforce, their primary tool, and activate billing processes directly, without the need to switch platforms.
To assign a subscription and set prices in Lago directly from Salesforce, use the provided Lago Flow template.
1. Log into your Salesforce instance;
2. Access the Setup section via the settings wheel icon in Salesforce;
3. Find and select `Flows` under Process Automation in the sidebar;
4. Locate and open the `Lago Template - Create Subscription in Lago on Opp Closed`;
5. Click 'Save As' to create and save your own version of the template; and
6. Do not forget to click the `Activate` button to activate your flow.